

How to Change a Drill Bit Properly: Quick Answer and Introduction
Changing a drill bit correctly is essential for safety, precision, and tool longevity. First, always power off and unplug your drill before any bit changes. Locate your chuck—the rotating collar that holds the bit—and turn it counterclockwise by hand or with a chuck key to loosen it. Remove the old bit, insert the new one straight into the chuck, and tighten clockwise until snug but not over-torqued. This simple five-minute process prevents accidents, ensures accurate drilling, and protects your equipment from damage.

LABEAR Keyless Drill Chuck Adapter, 1.5-6mm, 1/4" Hex Shank
- 1.5-6mm Keyless Drill Chuck: This mini drill chuck adapter holds drill bits from 1.5mm to 6mm, making it suitable for small drilling tasks, detail work, craft projects, woodworking, and daily DIY repair
- Quick Change 1/4" Hex Shank: The 1/4" hex shank fits compatible power drills, cordless drills, and electric screwdrivers, allowing quick attachment and removal for easier tool setup
- Mini 3-Jaw Chuck Design: Designed with a 3-jaw chuck structure to help grip small drill bits securely, making it useful for precision drilling, model making, jewelry work, and hobby projects
- Keyless Bit Changing: No chuck key is required. The keyless design lets you tighten or loosen drill bits by hand, helping you switch accessories faster during repair or assembly work
- Compact Tool Converter: A practical drill chuck converter for expanding the use of compatible drills and electric screwdrivers, suitable for home workshops, tool bags, woodworking, craft work, and DIY repairs


As an Amazon Associate we earn from qualifying purchases. Product prices and availability are accurate as of the date/time indicated.
Many DIYers overlook proper bit-changing procedures, leading to slipped bits, crooked holes, and potential injuries. Whether you’re working with a cordless drill, hammer drill, or benchtop model, the fundamentals remain consistent. Understanding chuck types, bit compatibility, and tightening techniques will transform you into a confident operator. This guide covers everything from safety protocols to troubleshooting common issues you’ll encounter in your workshop.
Key Takeaway: Always power off your drill, loosen the chuck fully, and tighten new bits evenly to ensure safe, accurate drilling every time.
What Are the Different Types of Drill Chucks and How Do They Work?
Drill chucks come in three main varieties: keyed chucks, keyless chucks, and specialized quick-change systems. Understanding your chuck type is crucial for proper bit installation. Each design offers different advantages depending on your drilling frequency and project requirements. Modern drills typically feature one of these systems, and knowing which you have prevents frustration and damage.
Keyed Chuck Systems
Keyed chucks require a small metal chuck key to tighten and loosen. You insert the key into one of three holes around the chuck’s perimeter and turn clockwise to tighten or counterclockwise to loosen. This design provides excellent holding power for heavy-duty applications and professional use. However, you must remember to remove the key before drilling—leaving it in can cause serious injury if the chuck suddenly rotates.
- Superior grip strength for demanding tasks and larger bits.
- Requires a separate tool (chuck key) for operation.
- Must be removed before drilling to prevent accidents.
- Common on professional-grade and benchtop drills.
Keyless Chuck Systems
Keyless chucks feature a grooved rotating collar you turn by hand to tighten and loosen. No separate tool is needed, making them convenient for quick bit changes. These chucks are standard on most consumer cordless drills sold today. They’re faster to use than keyed chucks but may not grip larger bits quite as firmly.
To use a keyless chuck, simply grip the collar with one hand while holding the drill steady with the other. Turn clockwise to tighten until snug. This design eliminates the risk of forgetting the chuck key, a major safety advantage for busy workshops.
Quick-Change Systems
Quick-change chucks use a spring-loaded mechanism that releases bits instantly with a button press. These premium systems save time on jobs requiring frequent bit changes. They’re popular among professionals doing repetitive drilling or switching between drilling and fastening tasks. Installation and removal take just seconds without any turning required.
Key Takeaway: Identify your chuck type before changing bits—keyed chucks need tool removal, keyless chucks work by hand, and quick-change systems offer maximum speed.
How Do You Safely Remove an Old Drill Bit?
Safe bit removal starts with powering down completely. Unplug corded drills or remove the battery from cordless models—never rely on the trigger lock alone. Let the drill cool for a minute if you’ve been using it heavily, as metal bits and chucks heat up during operation. This cooling period prevents burns and makes handling easier.
Step-by-Step Removal Process
- Power off and unplug the drill or remove the battery pack.
- Wait 60 seconds for the chuck and bit to cool completely.
- Locate the chuck and identify whether it’s keyed or keyless.
- Turn the chuck counterclockwise firmly until the bit falls free.
- Inspect the bit and chuck for debris or damage before proceeding.
For stubborn bits stuck in the chuck, apply penetrating oil around the chuck collar and let it soak for five minutes. Gently tap the chuck with a rubber mallet while turning counterclockwise. Never use excessive force, which can strip the chuck mechanism. If the bit still won’t budge, try gripping it with a rubber-coated wrench for better traction while turning the chuck.
Once the old bit is free, wipe away any dust, metal shavings, or debris from inside the chuck. A clean chuck ensures proper seating of the new bit and prevents wobbling during use. Use a small brush or compressed air to remove particles from the chuck’s interior grooves.
Key Takeaway: Always power down first, let the bit cool, turn the chuck counterclockwise firmly, and clean out debris before inserting a new bit.
What’s the Correct Method for Installing a New Drill Bit?
Installing a new bit correctly ensures straight holes and prevents slippage during drilling. Start by examining your new bit to confirm it matches your project requirements. Check the shank diameter against your chuck’s capacity—most consumer drills accept bits up to 3/8 inch or 10 millimeters. Verify the bit type matches your material: twist bits for wood and plastic, spade bits for large wood holes, masonry bits for concrete, and specialized bits for metal.
Insertion and Centering
Hold the drill with one hand and guide the bit straight into the chuck with the other. Push the bit in slowly until it seats fully against the chuck’s internal jaws. The shank should be inserted at least one inch into the chuck for secure holding. Never force the bit at an angle, which can damage the chuck mechanism or cause the bit to bind and slip.
For keyless chucks, grip the collar and turn clockwise slowly at first to center the bit. Feel for even resistance—if the chuck tightens unevenly, the bit isn’t centered. Back off, reposition, and try again. Once centered, continue tightening until snug. Hand-tighten only; over-tightening can strip the chuck’s internal mechanism.
Final Tightening Technique
- Insert the bit straight into the chuck until it seats fully.
- Tighten the chuck gradually, checking for even grip on all sides.
- Stop when you feel firm resistance—don’t force beyond this point.
- Spin the bit by hand to verify it rotates straight without wobbling.
- Test-run the drill at low speed before full-power operation.
For keyed chucks, insert the key into each of the three holes and give a quarter-turn, moving around the chuck evenly. This distributes pressure and ensures the bit grips uniformly. Remove the key immediately after tightening—never leave it in the chuck during operation.
Key Takeaway: Insert bits straight, tighten evenly until snug, verify straight rotation by hand, and always remove keyed chuck keys before drilling.
How Can You Avoid Common Drill Bit Changing Mistakes?
Common mistakes during bit changes lead to damaged bits, crooked holes, and safety hazards. The most frequent error is failing to power off the drill before changing bits. Accidental trigger squeezes can cause the spinning chuck to grab your fingers or clothing. Always establish a habit of unplugging or removing the battery as your first step, every single time.
Mistakes to Prevent
- Leaving keyed chuck keys in during operation—causes serious hand injuries.
- Over-tightening the chuck—strips internal mechanisms and damages bits.
- Inserting bits at an angle—causes wobbling and crooked holes.
- Not cooling hot bits—causes burns and makes handling difficult.
- Using damaged or dull bits—produces poor results and stresses the drill.
- Ignoring bit-to-material compatibility—reduces effectiveness and tool life.
Another critical mistake is over-tightening the chuck. Many users believe tighter equals better, but excessive force damages the chuck’s internal jaws and can cause the bit to slip under load. Tighten only until snug—you should not be able to turn the chuck further by hand. If you need a tool to tighten more, you’ve already tightened enough.
Inserting bits at an angle is surprisingly common among beginners. This causes the bit to sit off-center in the chuck, resulting in wobbling and crooked holes. Always hold the drill level and push the bit straight in. Take an extra second to ensure proper centering before tightening.
Key Takeaway: Prevent injuries and damage by powering off first, hand-tightening only, inserting bits straight, and removing chuck keys before drilling.
What Are Practical Tips for Efficient Bit Changing in Your Workshop?
Organize your bits by size and type in a dedicated storage system for quick access. A wall-mounted rack or drawer organizer keeps bits visible and prevents searching through toolboxes. Label each compartment by size and material type. This organization saves time and reduces the chance of grabbing the wrong bit mid-project.
Workflow Efficiency Steps
- Create a pre-project checklist of bits needed for the job.
- Arrange bits in order of use before starting to minimize changes.
- Keep a small brush nearby for quick chuck cleaning between bits.
- Develop a consistent power-off routine—make it automatic.
- Store your chuck key in a fixed location so you never misplace it.
- Inspect bits monthly for damage and replace worn ones promptly.
Keep a small notebook tracking which bits work best for different materials and projects. Over time, you’ll develop preferences for specific brands and types. This knowledge accelerates your work and improves results. Consider investing in a quality bit set that covers most common drilling tasks—better bits hold their edge longer and produce cleaner holes.
If you frequently switch between drilling and fastening tasks, consider upgrading to a quick-change chuck system. The time saved on numerous bit changes throughout a project day justifies the investment. For professional work or high-volume projects, quick-change systems are nearly essential.
Before starting any project, test your setup on scrap material. This confirms the bit is centered, the drill speed is appropriate, and you have good control. Test runs catch problems before they damage your finished workpiece. This simple habit prevents costly mistakes and improves precision.
Key Takeaway: Organize bits by type, plan bit changes before starting, maintain consistent power-off habits, and test on scrap before working on finished pieces.
How Does Proper Bit Changing Extend Your Drill’s Lifespan?
Correct bit changing procedures protect your drill’s internal mechanisms from premature wear and damage. Over-tightening the chuck gradually strips the internal jaws, eventually causing bits to slip under load. Proper hand-tightening maintains the chuck’s integrity for years of reliable service. This simple discipline eliminates expensive chuck replacements and keeps your drill functioning like new.
Using the right bit for each material prevents unnecessary stress on the motor and gearbox. Dull bits require more force, which strains the motor and generates excessive heat. Sharp, properly matched bits work efficiently and reduce wear. Replacing bits when they become dull is far cheaper than repairing a burned-out motor.
Keeping the chuck clean prevents debris from interfering with the clamping mechanism. Dirt and metal shavings accumulate over time, causing uneven bit seating and wobbling. A quick brush-out between bits takes thirty seconds and prevents problems. This basic maintenance extends chuck life significantly.
For related drilling techniques and advanced applications, check out our guides on how to use a hammer drill on brick and how to drill into concrete without a hammer drill for specialized approaches that protect your equipment.
Key Takeaway: Proper bit changing protects the chuck, extends motor life, reduces heat stress, and eliminates costly repairs through simple maintenance habits.
Recommended Products

DCA Cordless Drill Set, 354 in-lbs Torque, 3/8" Keyless Chuck, Electric Power Drill with 2.0Ah Battery and Charger,18+1 Position,25-Piece 20V Drill Driver Kit, ADJZ2035
- [354 in-lbs and 18+1 Clutch] The 20V 3/8-inch keyless chuck power drill delivers 354 in-lbs of torque and features 18+1 clutch settings for precise control, helping to prevent overdriving or stripping screws. It is suitable for various materials: wood (φ3/4 inch), metal (φ2/5 inch).
- [Extended Run Time with 2.0Ah Battery] This cordless drill set provides 33% more run time than a 1.5Ah battery, allowing you to drive through 800 screws on a full charge or drill through a 19/16-inch thick wooden board for 100 times.
- [Versatile 2-Speed Transmission] Adjust the speed between 0-400 RPM and 0-1500 RPM for customized performance in both screw driving and drilling tasks with this electric drill, making it ideal for DIY projects as well as more demanding applications.
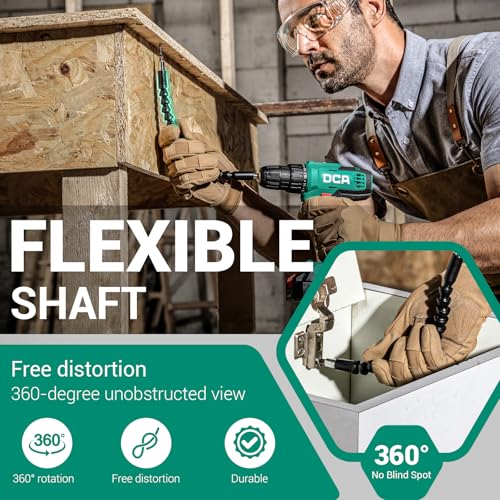
- [Flexible Shaft & LED Light] The drill driver kit includes a flexible shaft bit extension and a built-in LED light, making working in tight, dark spaces easier.
- [Durable Pure Copper Motor] The pure copper motor provides 1.5x more power, allowing it to drill through a 19/16-inch thick wooden board in just 8 seconds. The DCA drill has robust overload resistance and a large vent to prevent overheating.
- [Compact and lightweight design] Weighing only 2.8 pounds, the ergonomic design will not burden your body even after extended use.
- [What will You Get] 1 x 20V Power Drill Driver, 21 x Drilling/Driver Bits, 1 x Flexible Shaft Drill Bit Extension Kit, 1 x 2.0Ah Li-ion battery, 1 x 20V charger.




As an Amazon Associate we earn from qualifying purchases. Product prices and availability are accurate as of the date/time indicated.

DEWALT 14-Piece Drill Bit Set with 3-Flats Shank & Split Point
- 135 Degree Split point tip design to help reduce walking
- High Speed Steel to be used in plastic, wood, and metal
- Tapered web design for extreme durability and resisting breakage
- Black and gold coating to help prevent rust and wear
- 3-Flats shank to reduce spin-out in the chuck on sizes larger than 3/16-in
- Size markings on the drill bit shank for identifying sizes quickly


As an Amazon Associate we earn from qualifying purchases. Product prices and availability are accurate as of the date/time indicated.
Frequently Asked Questions
Can you change a drill bit while the drill is plugged in?
Never change a drill bit while plugged in, even with the trigger untouched. Accidental contact or a faulty switch could activate the drill unexpectedly, causing serious hand injuries. Always unplug corded drills or remove the battery from cordless models before any maintenance. This is non-negotiable safety protocol that takes just five seconds.
How tight should a drill bit be in the chuck?
Tighten the drill bit until snug—you should feel firm resistance but not need tools to tighten further. Hand-tight is the correct tension. Over-tightening strips the chuck’s internal mechanism and can damage the bit. If you can’t tighten more by hand, you’ve reached the proper tension. Test by trying to rotate the chuck slightly; it shouldn’t move.
What if your drill bit won’t come out of the chuck?
Apply penetrating oil around the chuck collar and let it soak five minutes. Gently tap the chuck with a rubber mallet while turning counterclockwise. Grip the bit with a rubber-coated wrench for extra traction if needed. Never use excessive force, which can damage the chuck. If still stuck, let the oil soak longer or consult your drill’s manual for specific guidance.
Is it safe to use a damaged or bent drill bit?
Never use damaged, bent, or cracked drill bits. They wobble during rotation, producing crooked holes and stressing your drill’s motor and gearbox. Damaged bits also pose safety hazards—they can suddenly break or slip from the chuck. Replace any visibly damaged bits immediately. Investing in quality replacement bits costs far less than repairing a damaged drill.
Do different drill types require different bit-changing procedures?
The fundamental process remains the same across all drill types—power off, loosen the chuck, remove the old bit, insert the new bit straight, and tighten evenly. However, hammer drills and rotary drills may have specific chuck designs or bit compatibility requirements. Always consult your drill’s manual for specific guidance on your model. Most modern drills follow standard procedures with minor variations.
How often should you replace drill bits?
Replace drill bits when they become dull, which you’ll notice by slower drilling speed and increased heat. Sharp bits should easily penetrate material with moderate pressure. High-speed steel bits typically last longer than cheaper alternatives. Professional users often replace bits after each project, while DIYers can extend bit life through proper storage and maintenance. Inspect bits monthly and replace as needed.
How Should You Maintain Your Chuck for Long-Term Performance?
Chuck maintenance is simple but essential for reliable drill performance. Clean the chuck monthly by removing visible debris with a small brush or compressed air. This prevents dirt accumulation that interferes with bit seating and clamping. A clean chuck ensures bits sit centered and grip evenly, producing straight holes and reducing wobbling.
Occasionally apply a light machine oil to the chuck’s exterior grooves to prevent rust and keep the mechanism smooth. Wipe away excess oil with a clean cloth. Avoid over-oiling, which attracts dust and debris. This minimal maintenance keeps your chuck functioning smoothly for years.
Inspect the chuck regularly for visible damage, cracks, or bent jaws. If you notice the chuck won’t tighten evenly or bits slip under load, the internal mechanism may be damaged. In this case, professional repair or replacement is necessary. Catching problems early prevents catastrophic failure mid-project.
Key Takeaway: Clean your chuck monthly, apply light oil occasionally, and inspect regularly for damage to maintain reliable performance and extend tool life.
What Should You Know About Drill Bit Types and Compatibility?
Different materials require different bit types for optimal results. Twist bits work for wood and plastic, spade bits for large wood holes, masonry bits for concrete and brick, and metal-specific bits for steel and aluminum. Using the wrong bit wastes time, produces poor results, and stresses your drill. Understanding bit compatibility prevents frustration and improves project outcomes significantly.
Bit shank size must match your chuck’s capacity. Standard consumer drills accept 1/4-inch or 3/8-inch shanks. Professional drills handle larger shanks. Forcing an oversized bit into a small chuck damages both the bit and chuck mechanism. Always verify shank size before attempting installation. This simple check prevents expensive damage.
Quality matters significantly with drill bits. Premium bits hold their edge longer, produce cleaner holes, and last through multiple projects. Budget bits dull quickly and require frequent replacement. Investing in quality bits saves money long-term and improves your work quality. Consider purchasing a comprehensive bit set covering various sizes and materials for complete project flexibility.
Key Takeaway: Match bit type to material, verify shank compatibility with your chuck, and invest in quality bits that last longer and perform better.
Conclusion: Why Mastering Proper Drill Bit Changing Matters
Changing a drill bit properly is fundamental to safe, accurate, and efficient drilling. This seemingly simple task protects your hands, extends your drill’s lifespan, and ensures professional-quality results. By following these procedures—powering off, loosening completely, inserting straight, and tightening evenly—you eliminate common accidents and equipment damage.
The discipline of proper bit changing develops into broader workshop safety habits. When you establish the routine of unplugging before maintenance, you’re building muscle memory that prevents injuries across all tool use. This single habit, repeated thousands of times, could save your fingers or your life.
Your drill is an investment that will serve you for decades with proper care. Respecting the fundamentals of bit changing—though they take just minutes—demonstrates respect for your tools and your safety. Whether you’re a weekend DIYer or professional contractor, these practices remain unchanged. Commit to these procedures today, and you’ll enjoy reliable drilling performance and accident-free operation for years to come. For advanced drilling applications, explore our guides on specialized techniques and complementary tools to expand your capabilities.







Write Your Review
No reviews yet. Be the first to share your experience!