

How to Cut Wood with a Hand Saw Straight: Quick Answer
Cutting wood straight with a hand saw requires three essential elements: proper blade selection, correct body positioning, and consistent stroke technique. Start by marking your cut line clearly using a pencil and a straightedge. Position the saw at a 45-degree angle to the wood, let gravity do the initial work during the downstroke, and maintain steady, even pressure throughout. Most beginners struggle with hand saw cuts because they apply too much downward force and rush the process. Success comes from relaxed, rhythmic strokes that let the saw’s teeth do the cutting work naturally.

Japanese Pull Saw 6" Double Edge SK5 Blade Woodworking
- An Idea Gift for Woodworker, Carpenter and Craft Man
- Optimal Blade Size: Through numerous manual tests, We found that the 6" Japanese saw blade is the ideal size for precise cutting, enabling easy flush and finish cuts.
- Durable and Flexible Saw Blade: The hand saw blade is made of SK5 high-carbon steel. The Japanese pull saw teeth are processed by a high-frequency hardening machine imported from Japan, and the hardness can reach HRC60-63 degrees.
- Double Edged: One side of Japanese hand saw is 17 TPI for cutting hardwood, and the other side is 14 TPI for cutting softwood. Also can seen as Rip cut and Cross cut.
- Hardened 3-Edge Teeth: The hand saw has three-sided grinding gear design, sharp edge, faster chip removal, and smoother cutting.
- Efficient after-sales service: if you have any problems, you can ask us for help at any time, we will reply you within 24 hours to ensure your satisfaction and peace of mind.


As an Amazon Associate we earn from qualifying purchases. Product prices and availability are accurate as of the date/time indicated.
Why Hand Saws Matter in 2026
Hand saws remain essential woodworking tools despite modern power tools. They offer precision, control, and quiet operation ideal for detailed projects, furniture assembly, and situations where electricity isn’t available. Hand saws also cost significantly less than power alternatives and require minimal maintenance. Understanding proper hand saw technique builds foundational skills that improve overall craftsmanship and tool confidence.
Key Takeaway: Mastering hand saw cuts depends on technique, not strength.
What Type of Hand Saw Should You Use for Straight Cuts?
Selecting the right hand saw directly impacts cut quality and ease. Different saws serve different purposes, and understanding these distinctions prevents frustration and poor results. The most common types include the crosscut saw, ripsaw, and backsaw, each designed for specific cutting angles and wood grain directions. Beginners often use the wrong saw type, which makes achieving straight cuts unnecessarily difficult.
Common Hand Saw Types
- Crosscut Saw: Cuts across wood grain; features angled teeth; ideal for general woodworking.
- Ripsaw: Cuts parallel to wood grain; has vertical teeth; used for splitting boards lengthwise.
- Backsaw: Short, rigid blade with spine reinforcement; perfect for precise, straight crosscuts.
- Coping Saw: Thin blade with tight radius; best for curves, not straight cuts.
- Japanese Saw: Pulls rather than pushes; delivers cleaner cuts with minimal tearout.
For beginners learning straight cuts, a quality crosscut saw offers the best balance of control and versatility. Backsaws excel at precision work but require more technique. Consider the right tool selection fundamentals when building your toolkit.
Key Takeaway: Choose a crosscut saw or backsaw for learning straight cuts.
How Should You Position Your Body for Accurate Hand Saw Cuts?
Body positioning determines cutting accuracy more than most beginners realize. Poor stance causes arm fatigue, inconsistent pressure, and wandering cuts. Your body should form a stable, comfortable foundation that allows the saw to move in a straight line without twisting. Standing correctly reduces strain and builds muscle memory for consistent results across multiple cuts.
Proper Stance and Posture
- Stand with feet shoulder-width apart, perpendicular to the workbench.
- Keep your dominant shoulder slightly forward and relaxed.
- Position the workpiece at elbow height for optimal leverage and visibility.
- Maintain a straight back; avoid hunching or leaning excessively forward.
- Keep your cutting arm extended but not locked; allow natural elbow bend.
Your non-dominant hand should guide the blade with a light touch on the wood surface near the cut line. Never place fingers directly in the saw’s path. The hand saw should move in a smooth vertical plane; any twisting or angling causes the blade to wander off your marked line. Practice this positioning without cutting first to build muscle memory.
Secure your workpiece firmly using a bench vise or clamp. Unstable wood shifts during cutting, making straight cuts impossible. The piece should not move or vibrate when you apply normal sawing pressure. A stable setup eliminates one major variable in the cutting equation.
Key Takeaway: Stable stance and firmly clamped wood create the foundation for straight cuts.
What Technique Produces the Straightest Hand Saw Cuts?
Proper sawing technique separates accurate cuts from wandering, angled disasters. The most common mistakes include applying excessive downward pressure, rushing the stroke, and twisting the blade mid-cut. Experienced woodworkers use gravity and the saw’s natural design to do most of the work. Your role is to guide the blade smoothly along the marked line with minimal force.
Step-by-Step Cutting Technique
- Mark the line: Use a sharp pencil and straightedge; mark clearly on both sides of the wood.
- Start the cut: Position the blade on the line at a 45-degree angle; use light, short strokes to establish the kerf.
- Establish rhythm: Gradually increase stroke length; maintain even pressure throughout the motion.
- Use gravity: Let the saw’s weight pull down; don’t force the blade through the wood.
- Maintain alignment: Keep the blade perpendicular to the wood surface; watch both sides of the cut.
- Finish strong: Reduce pressure on the final strokes; support the waste piece to prevent splitting.
The downstroke should feel effortless; if you’re straining, you’re pressing too hard. The upstroke requires minimal pressure—just enough to return the blade to the starting position. Aim for 40 to 60 strokes per minute; faster speeds often indicate excessive force and fatigue. Consistency in stroke length and pressure produces the straightest cuts.
Watch the blade from multiple angles during cutting. If the saw drifts left or right, make micro-adjustments to your guide hand’s pressure. Never try to force the blade back onto the line suddenly; gradual corrections work better. Experienced sawyers develop an almost meditative rhythm that feels natural and produces excellent results.
Key Takeaway: Smooth, consistent strokes with minimal force produce straighter cuts than aggressive sawing.
How Can You Mark Cut Lines Accurately Before Sawing?
Accurate marking prevents mistakes that no technique can fix. A poorly marked line leads to poor cuts regardless of your sawing skill. The marking process deserves as much attention as the actual cutting. Precision starts before the saw touches the wood.
Marking Best Practices
- Use a sharp pencil or marking knife for thin, visible lines.
- Measure twice; mark once to avoid costly errors.
- Reference the tape measure guide for accurate measurements before marking.
- Mark on both sides of the wood for reference during cutting.
- Use a straightedge or combination square to ensure the line is truly straight.
- Darken the line slightly so it’s visible from your cutting position.
A marking knife creates a fine, precise line better than pencil alone. The knife slightly scores the wood surface, giving the saw teeth a defined starting point. For crosscuts, draw a line perpendicular to the wood grain. For rip cuts, draw parallel to the grain. The line should be thick enough to see but thin enough to remove with the saw kerf.
Key Takeaway: Clear, accurately marked lines are essential for straight hand saw cuts.
What Common Mistakes Should You Avoid When Hand Sawing?
Understanding common pitfalls helps you avoid them before they ruin your work. Most hand saw problems stem from technique errors rather than tool defects. Recognizing these mistakes early allows you to correct course and improve results quickly. Learning from others’ experiences accelerates your skill development significantly.
Mistakes That Cause Crooked Cuts
- Applying excessive downward pressure; let gravity and saw weight do the work.
- Twisting the blade during the stroke; maintain a vertical plane.
- Rushing the cut; slow, steady strokes produce better results.
- Using a dull blade; sharp teeth cut straighter and require less force.
- Starting the cut at the wrong angle; begin at 45 degrees, then adjust gradually.
- Failing to secure the workpiece; movement causes blade wandering.
- Neglecting to mark both sides of the wood; limits your reference points.
Dull blades deserve special attention because they’re often the hidden culprit behind poor cuts. A dull saw requires excessive pressure, which causes arm fatigue and loss of control. Sharper blades cut faster with less effort, making straight cuts easier. Replace or sharpen your blade regularly for consistent performance.
Many beginners also fail to support the waste piece at the end of the cut. As you near completion, the piece can drop suddenly, causing the blade to bind and the cut to go crooked. Use your non-cutting hand to support the waste piece gently as you finish the final strokes.
Key Takeaway: Proper technique and maintenance prevent most hand saw cutting problems.
How Can You Practice and Improve Your Hand Saw Skills?
Skill development requires deliberate practice with focused attention on technique. Simply cutting wood repeatedly without conscious improvement doesn’t build expertise. Structured practice with feedback accelerates learning and builds confidence. Set specific goals for each practice session.
Effective Practice Methods
- Start with softwood like pine; easier to cut than hardwoods.
- Practice on scrap pieces before attempting finished projects.
- Focus on one technique element per session (stance, stroke, pressure, etc.).
- Measure the straightness of your cuts with a straightedge afterward.
- Record progress photos to visualize improvement over time.
- Practice cuts at different angles and wood grain directions.
- Cut increasingly thicker pieces as confidence grows.
Begin with simple crosscuts on thin pine boards. These provide immediate feedback on your technique without excessive difficulty. After mastering basic crosscuts, progress to thicker wood and different grain directions. Each challenge builds upon previous skills systematically.
Video yourself cutting occasionally to identify technique flaws you can’t feel. Watching your form from an outside perspective reveals habits like blade twisting or excessive pressure. Many skilled woodworkers still review their technique periodically to maintain excellence.
Key Takeaway: Deliberate practice with focused feedback accelerates hand saw skill development.
What Maintenance Keeps Your Hand Saw Performing Optimally?
Regular maintenance ensures your hand saw stays sharp and cuts straight. Neglected saws accumulate rust, dull teeth, and alignment issues that sabotage cutting accuracy. Proper care extends tool life and maintains consistent performance. Maintenance is far cheaper than replacing damaged tools.
Hand Saw Maintenance Checklist
- Clean the blade after each use to remove sawdust and debris.
- Dry the blade completely to prevent rust formation.
- Apply light machine oil to the blade surface for rust protection.
- Check blade alignment; bent blades won’t cut straight.
- Sharpen teeth regularly or replace the blade when dull.
- Store saws in a dry location away from moisture.
- Inspect the handle for cracks or damage before each use.
A dull blade is the most common reason hand saws fail to cut straight. Sharpening requires specialized knowledge or professional service. Many woodworkers find blade replacement more practical than attempting DIY sharpening. Modern replacement blades are affordable and readily available.
Store your hand saw in a dry location to prevent rust. A light coat of machine oil on the blade provides additional protection during storage. Keep the saw separate from other tools to prevent damage to the blade or handle.
Key Takeaway: Regular cleaning, drying, and sharpening maintain straight-cutting performance.
How Does Hand Saw Technique Relate to Other Woodworking Skills?
Hand saw mastery builds foundational skills that improve overall woodworking ability. The precision, control, and patience developed through hand sawing transfer to other tools and techniques. Understanding how to work with hand tools creates a stronger foundation than jumping directly to power tools. This knowledge becomes invaluable when power tools aren’t available or practical.
The marking and measurement skills required for straight hand saw cuts directly apply to using other tools. Accurate measurement prevents waste and frustration across all woodworking projects. Consider exploring tape measure reading techniques to complement your hand saw skills. Learning related tools like screwdriver selection and proper nailing techniques builds comprehensive woodworking competence.
Key Takeaway: Hand saw skills form a foundation for broader woodworking expertise.
Recommended Products

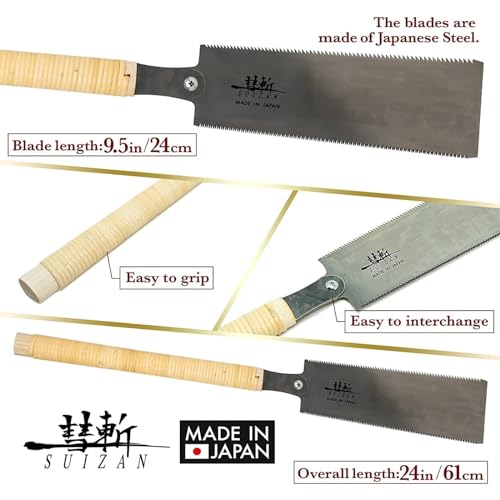
SUIZAN Ryoba Double Edge Saw 9.5" Assembly ver - Japanese Pullsaw Hand Saws
- JAPANESE STYLE PULL SAW: This product is a “Pull Saw.” Most people are used to European saws, called “push saws,” which cut through a pushing motion. On the other hand, Japanese saws cut materials via pulling and are called “pull saws.” In comparison to “push saws,” this Japanese product is lighter in weight, requires less power, and results in a cleaner edge.
- JAPANESE STEEL: All SUIZAN Japanese saws consist of top quality Japanese steel. The high-quality steel makes razor sharp cuts.
- MADE IN JAPAN: All SUIZAN woodworking tools are manufactured in Japan by Japanese master craftsmen. The whole process of making these tools are completed in one of Japan’s towns known for its craft-making tradition with a history of over 100 years.
- DIVERSIFY YOUR WOODWORKING LIFE: No matter if you are a master or a beginner, using traditional Japanese-style saws gives you a brand new experience and lets you make a wider range of woodworking products, thus changing your life!
- For Rip & Cross Cut, Blade Length: 9.5"(240mm), Blade Thickness: 0.02"(0.5mm), TPI: 9&15(1.67mm), Kerf Width: 0.03"(0.8mm), Overall Length: 23.2"(59cm), Since each handle is individually wrapped by hand by craftspeople, its appearance may vary from one to another. Cracks may occur during the manufacturing process. It is not a defect.
- ASSEMBLY VERSION: Please kindly assemble this product yourself.




As an Amazon Associate we earn from qualifying purchases. Product prices and availability are accurate as of the date/time indicated.
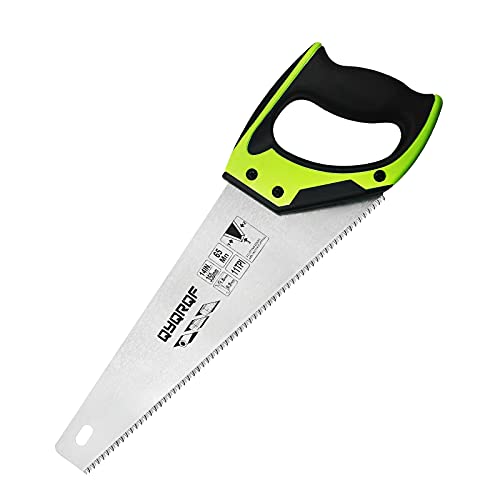
14-Inch Pro Hand Saw with 11 TPI Fine-Cut Blade & Soft Grip
- Size:14inches, 350mm hand saw, 0.9MM Thick.
- Material: 65Mn steel, heat treated, soft Ergonomic Non-Slip TPR Handle.
- Wide usage: Our pro hand saw is designed for precise cutting including wood, plastic pipe, plywood, wallboard. Ideal for framers, general contractors and woodworkers.
- QUICK CUTS: Three cutting surfaces to cut up to 50% faster than traditional handsaws. Pro hand saw fast cuts on push and pull strokes. Deep Gullets provide rapid removal of chips.
- Package: With low-friction coating on blade and extra plastic protection on teeth and hard paper sleeve around blade.


As an Amazon Associate we earn from qualifying purchases. Product prices and availability are accurate as of the date/time indicated.
Conclusion: Can You Master Straight Hand Saw Cuts?
Cutting wood straight with a hand saw is absolutely achievable through proper technique, appropriate tool selection, and consistent practice. The fundamentals—correct body positioning, smooth strokes, and accurate marking—apply to all hand saw work. Most beginners underestimate how quickly they can improve with focused effort and deliberate practice sessions.
Start with quality tools and understand why each component matters. A sharp blade, stable workpiece, and clear marking line eliminate unnecessary obstacles. Then focus on developing smooth, consistent sawing technique through repeated practice on scrap wood. Patience and relaxation produce better results than force and rushing.
Your hand saw will become one of your most reliable woodworking tools once you develop confidence and skill. The quiet precision of hand sawing offers satisfaction that power tools rarely match. Invest time in mastering this fundamental skill, and you’ll find countless applications for straight, accurate hand saw cuts throughout your woodworking journey. The techniques you learn now will serve you for decades of successful projects.







Write Your Review
No reviews yet. Be the first to share your experience!