

How to Sharpen a Wood Chisel: Quick Answer and Introduction
Sharpening a wood chisel requires a whetstone or honing stone, proper technique, and consistent practice. A sharp chisel is essential for clean woodworking cuts and prevents frustration during projects. Most woodworkers sharpen chisels using whetstones in 1000-8000 grit ranges, maintaining a 25-30 degree bevel angle. The process takes 5-15 minutes once you develop muscle memory. A dull chisel creates tear-out, requires excessive force, and produces inferior results. Investing time in proper sharpening transforms your woodworking quality dramatically. This guide covers everything from selecting stones to mastering the sharpening stroke.

Chisel Sharpening Jig, Wood Honing Guide for Chisels and Planes Width 0.1" to 2.8" with Sharpening Angle Fixture, Angle Gauge from 10° to 45°(With 2 Sharpening Stones)
- For Accurate Honing: This chisel sharpening kit consists of a sharpening guide, a sharpening stone, a sharpening angle gauge and a sharpening angle fixture for creating straight and consistent bevel. Two adjustable jaws of the sharpener help securely clamp the blade at the correct bevel angle to whetstone surface. Make each honing accurate, consistent, and effective
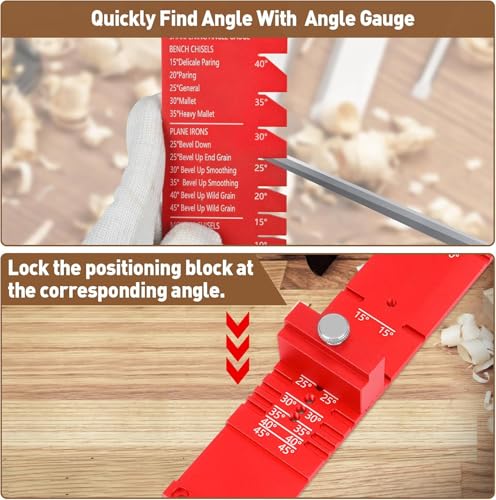
- Angle Gauge & Angle Fixture: Instead of estimating the bevel angle by eye, this honing guide kit features an angle gauge to find blade’s bevel angle quickly. What’s more, our innovative angle fixture adopts a positioning block to help set the blade length precisely on it. Greatly simplify your sharpening setup process and improve the honing accuracy
- Four Grit Sharpener:Features 400#/1000# grits for sharpening and repair—400# for chips and reshaping, 1000# for honing and maintenance, durable diamond surfaces wear longer and never need flattening, outperforming traditional stones.Achieve razor-sharp edges and a polished finish with 3000# and 8000# grits options. Includes a non-slip base for stability.
- High Compatibility: Chisels and plane blades ranging from 0.1 in to 2.8 in width fit the honing guide securely, easily meeting your various honing needs. Moreover, our extended roller always ensures rapid, smooth and stable honing at the correct bevel angle regardless of blade width
- Easy To Operate: First, find out the chisel’s bevel angle with the angle gauge. Then lock the positioning block at the same angle on fixture. Place the chisel sharpening jig on fixture and adjust the knob at either side to make opening larger. Then insert the blade and make the blade tip contact the groove on the positioning block. Tighten the screw to fix the blade. Finally, Start rolling the chisel honing jig back and forth on the whetstone
- Built To Last: Mainly crafted from anodized solid CNC-machined aluminum alloy and stainless steel material, this chisel honing guide is rustproof, corrosion-resistant, and durable. Besides, high precision laser etched markings contribute to great readability under low-light conditions and will not wear out over time. A valuable addition to your toolbox




As an Amazon Associate we earn from qualifying purchases. Product prices and availability are accurate as of the date/time indicated.
Wood chisels are precision tools that demand regular maintenance. Unlike saws or planes, chisels need frequent sharpening because their flat bevels dull quickly during use. A properly sharpened chisel should slice paper cleanly and cut end-grain wood without crushing fibers. Many beginners struggle because they use incorrect angles or inconsistent pressure. The good news is that sharpening becomes intuitive with practice. Understanding the fundamentals helps you maintain tool performance and extend chisel lifespan significantly.
Key Takeaway: Sharp chisels require whetstones, proper angle maintenance, and consistent technique to achieve clean woodworking results.
What Equipment Do You Need to Sharpen a Wood Chisel?
Sharpening wood chisels requires specific tools and materials. The most critical item is a whetstone or honing stone. Quality stones last decades and improve with age. You’ll also need a honing guide to maintain consistent angles, though experienced woodworkers often freehand sharpen. Water or oil serves as a lubricant depending on stone type. A strop with compound provides final polishing and extends the time between major sharpenings.
Essential equipment includes:
- Whetstones in multiple grits: 1000 for dull chisels, 4000-6000 for regular maintenance, 8000+ for final polishing.
- Honing guide or jig to maintain consistent bevel angles between 25-30 degrees.
- Lubricant: water for water stones, mineral oil for oil stones, or specialty honing fluids.
- Strop and stropping compound for micro-polishing and edge refinement.
- Flat surface: granite plate or glass to flatten stones and check blade flatness.
- Towel or cloth for wiping and drying stones and chisels.
Choosing the Right Whetstones
Whetstones come in two main types: water stones and oil stones. Water stones are faster cutting and popular among modern woodworkers. Oil stones last longer and require less maintenance but cut more slowly. Japanese water stones offer excellent results for Japanese chisels. Arkansas oil stones work beautifully for Western chisels. Your choice depends on budget, space, and personal preference.
Grit selection matters significantly. A 1000-grit stone removes damage and reshapes dull bevels quickly. Use 4000-6000 grit for regular maintenance sharpening every few projects. An 8000-grit or higher stone creates a mirror-polished edge for the finest work. Many woodworkers use a two-stone system: 1000 for major work and 6000 for maintenance. This approach balances speed with edge quality.
Understanding Honing Guides
Honing guides clamp onto chisels and maintain consistent angles automatically. They’re invaluable for beginners learning proper technique. Guides eliminate guesswork and produce repeatable results. Popular models include the Eclipse guide and Veritas guide. Both work excellently and last indefinitely. However, guides slow the sharpening process slightly compared to freehand work.
Key Takeaway: Select whetstones based on your chisel type and budget, then add a honing guide to maintain consistency.
What Is the Correct Angle for Sharpening a Wood Chisel?
The bevel angle is critical for chisel performance. Most Western chisels use a 25-30 degree primary bevel. Japanese chisels typically use 20-25 degrees for softer steel. Bench chisels work best at 30 degrees for durability. Paring chisels perform better at 20-25 degrees for delicate work. Maintaining consistency matters more than hitting an exact number. A slight variation of 2-3 degrees won’t significantly impact performance.
Understanding angle mechanics helps you sharpen effectively:
- Lower angles (20-25°) create sharper edges but dull faster and chip more easily.
- Higher angles (30-35°) produce durable edges that last longer in hardwoods.
- Most general-purpose chisels perform optimally at 25-28 degrees.
- A secondary micro-bevel at 30-35° adds durability without sacrificing sharpness.
Maintaining Consistent Angles
Consistency is more important than perfection. Mark the bevel with a permanent marker before sharpening. The marker disappears as you sharpen, showing you’ve reached the bevel. This visual feedback helps beginners maintain proper angle. With practice, your hand develops muscle memory. Many experienced woodworkers sharpen freehand without guides, maintaining excellent angles through feel alone.
A honing guide removes angle guesswork entirely. Simply set it once to your desired angle, clamp the chisel, and sharpen. The guide ensures every stroke maintains perfect consistency. This approach works especially well for learning. Once comfortable, many woodworkers transition to freehand sharpening for speed.
Key Takeaway: Maintain a consistent 25-30 degree primary bevel using either guides or marker feedback for optimal chisel performance.
How Do You Execute the Proper Sharpening Stroke?
The sharpening stroke separates excellent results from mediocre ones. Begin with your whetstone secured on a flat surface. Wet the stone thoroughly if using water stones. Position the chisel at your chosen angle against the stone. Apply light to moderate pressure on the back edge of the bevel. This pressure concentrates the sharpening action where the bevel meets the back edge.
Execute strokes with these techniques:
- Push the chisel away from you in one smooth motion across the stone’s length.
- Lift the chisel at the end of the stroke and return to the starting position without pressure.
- Maintain consistent angle throughout each stroke—this is critical for developing muscle memory.
- Use the entire stone surface to avoid creating a groove in one area.
- Sharpen the back flat edge occasionally to remove the burr and maintain flatness.
Developing Feel and Consistency
Beginners often apply too much pressure, which slows sharpening and damages stones. Light pressure actually works faster and produces better results. Let the stone do the work. Your job is maintaining angle and guiding the chisel smoothly. After 20-30 strokes, check your progress by examining the bevel under light. You should see a consistent shiny surface forming across the entire bevel width.
The burr formation indicates you’re nearly done. As you sharpen, metal accumulates on the back edge, creating a tiny raised burr. Once you feel this burr along the entire edge, switch to lighter pressure. A few more strokes remove the burr and complete the sharpening. Testing on paper confirms sharpness—a truly sharp chisel slices paper cleanly without crushing fibers.
Key Takeaway: Use light pressure, maintain consistent angle, and sharpen until a burr forms, then remove it with final light strokes.
What Are the Best Practical Steps to Sharpen Your Chisels?
Follow this systematic approach for consistent results. Start by assessing your chisel’s current condition. A very dull chisel needs 1000-grit work first. A slightly dull chisel jumps straight to 4000-6000 grit. Organize your workspace with stones, water container, towel, and lighting. Good lighting reveals edge condition and burr formation clearly. This preparation ensures smooth, uninterrupted sharpening sessions.
Step-by-step sharpening process:
- Secure the whetstone and wet it thoroughly if it’s a water stone.
- Clamp the chisel in a honing guide or position it freehand at your chosen angle.
- Make 20-30 forward strokes with light pressure, using the entire stone surface.
- Check the bevel periodically—you should see a consistent shiny surface forming.
- Switch to the next grit stone once the entire bevel is shiny.
- Repeat the stroking process on 4000-grit, then 6000-8000 grit stones.
- Flatten the back edge on your finest stone to remove burrs completely.
- Test sharpness by slicing paper or cutting end-grain wood.
- Clean the chisel and stone thoroughly after sharpening.
- Store chisels safely with edge protection to prevent dulling.
Progression Through Multiple Stones
Moving through grits systematically creates the finest edges. Start with 1000-grit only if the chisel is very dull or damaged. Most maintenance sharpening begins at 4000-grit. Each finer grit removes the scratches from the previous stone, refining the edge progressively. By the time you reach 8000-grit, the edge is mirror-polished and extremely sharp. This progression takes 10-15 minutes for experienced sharpeners.
Don’t skip grits or rush through stones. Skipping from 1000 to 8000 leaves scratches that compromise edge quality. Each grit serves a purpose in the progression. The finer grits don’t remove much material—they refine what the coarser stones created. This systematic approach produces superior edges compared to random sharpening methods.
Maintenance Sharpening Routine
Regular maintenance prevents the need for major resharpening. Sharpen chisels after every 2-3 projects or whenever they feel slightly dull. Maintenance sharpening takes only 5 minutes on a 6000-grit stone. This frequent approach keeps edges sharp without extensive work. Many professional woodworkers sharpen between every project. This habit maintains peak performance and prevents frustration from dull tools.
Key Takeaway: Progress through grits systematically, maintain consistent pressure, and establish a regular sharpening routine for peak performance.
How Do You Maintain Your Whetstones Long-Term?
Proper stone maintenance extends their lifespan significantly. Flatten your stones regularly to prevent dishing. A dished stone can’t sharpen properly because the chisel rocks instead of making full contact. Check flatness using a straightedge or by testing on a flat surface. Flatten water stones by rubbing them against a flattening plate or coarser stone. Oil stones need less frequent flattening but still require periodic maintenance.
Stone care guidelines include:
- Flatten water stones every 10-20 sharpening sessions using a flattening stone or plate.
- Keep water stones wet during use and clean them immediately after sharpening.
- Store water stones in a sealed container to prevent drying out.
- Oil stones need occasional cleaning with solvent to remove metal particles.
- Never allow water stones to freeze—water expansion damages the stone structure.
- Keep stones covered when not in use to prevent dust accumulation.
Flattening Techniques
Flattening is essential for maintaining sharpening quality. A flattening stone or diamond plate works excellently for water stones. Rub the water stone against the flattening surface in circular motions. Water stones flatten quickly compared to oil stones. A few minutes of work restores flatness. Some woodworkers use sandpaper on glass for emergency flattening. This works but wears sandpaper quickly and isn’t ideal for regular maintenance.
Key Takeaway: Flatten stones regularly, store them properly, and clean them immediately after use to maintain long-term sharpening quality.
What Common Mistakes Should You Avoid When Sharpening?
Beginners make predictable mistakes that compromise results. Applying excessive pressure is the most common error. Many people assume harder pressure sharpens faster—the opposite is true. Light, consistent pressure produces superior results. Excessive pressure damages stones, creates heat, and produces uneven sharpening. Let the stone do the work while you maintain angle and guide the chisel.
Common sharpening mistakes:
- Using inconsistent angles—the primary cause of poor edge quality and slow sharpening.
- Skipping grits or jumping from coarse to fine without intermediate steps.
- Not flattening stones regularly, resulting in dished surfaces and poor sharpening.
- Sharpening only the bevel while ignoring the back edge flatness.
- Applying too much pressure, which damages stones and slows sharpening.
- Using dirty or contaminated stones that scratch instead of sharpening.
- Not testing sharpness properly—paper slicing is the best confirmation.
Troubleshooting Dull Results
If your chisel remains dull after sharpening, several issues might be present. First, verify you’re maintaining proper angle. Mark the bevel with marker again and check that the entire bevel is sharpened uniformly. Second, confirm your stone is flat. A dished stone can’t sharpen effectively. Third, ensure you’re using proper pressure and stroking technique. Finally, test your sharpness accurately—paper slicing is definitive.
If edges still disappoint, consider your stone quality. Cheap stones cut slowly and unevenly. Investing in quality whetstones dramatically improves results. Japanese water stones offer excellent value and performance. Once you experience quality stones, cheaper alternatives become frustrating. This is one area where spending more yields genuine improvements.
Key Takeaway: Avoid excessive pressure, maintain consistent angles, and flatten stones regularly to prevent the most common sharpening problems.
How Can You Test and Confirm Chisel Sharpness Accurately?
Proper testing confirms sharpening success. Paper slicing is the gold standard test. A truly sharp chisel slices paper cleanly without crushing fibers. Hold paper vertically and slice downward—a sharp edge cuts smoothly. A dull edge crushes fibers and creates a ragged cut. This simple test reveals edge quality immediately. Never rely on finger tests—they’re dangerous and unreliable.
Additional sharpness tests include:
- Arm hair test: gently rest the edge against arm hair—sharp edges cut cleanly without pulling.
- Thumbnail test: scrape the edge across a thumbnail—sharp edges leave a thin line, dull edges slip.
- Wood test: cut end-grain softwood—sharp chisels produce clean cuts, dull ones tear fibers.
- Hardwood test: attempt paring a hardwood edge—sharp chisels cut smoothly, dull ones require excessive force.
Understanding Edge Conditions
Not all sharp edges perform identically. A mirror-polished edge (8000+ grit) is sharper but more delicate. A satin-finished edge (4000-6000 grit) is slightly less sharp but more durable. For general woodworking, 6000-grit finishing is ideal. For fine detail work, 8000-grit produces superior results. For rough work, 4000-grit suffices. Match your finishing grit to your intended work.
Key Takeaway: Paper slicing is the definitive sharpness test—truly sharp chisels slice cleanly without crushing fibers.
What Is the Relationship Between Chisel Sharpness and Woodworking Quality?
Sharp chisels transform your entire woodworking experience. Dull chisels require excessive force, causing hand fatigue and poor control. Sharp chisels cut effortlessly, producing clean surfaces and precise results. This difference becomes obvious immediately after sharpening—work that felt difficult becomes enjoyable. Professional woodworkers maintain razor-sharp chisels constantly because dull tools waste time and produce inferior results.
Sharp chisels provide these benefits:
- Clean cuts without tear-out or fiber crushing in hardwoods and end-grain.
- Reduced hand fatigue because cutting requires minimal force.
- Better control and precision for delicate joinery and detail work.
- Faster work because sharp tools cut more efficiently.
- Superior surface quality that requires less sanding afterward.
- Safer operation—sharp tools are more predictable and require less force.
Integrating Sharp Tools Into Your Workflow
Make sharpening part of your regular routine. Many woodworkers sharpen chisels at the start of each session. Others maintain a “sharp tool” station where chisels live when not in use. This prevents accidentally dulling tools during storage. Some professionals sharpen between projects to ensure peak readiness. Whatever system you choose, consistency matters. Regular sharpening prevents the frustration of discovering dull tools mid-project.
If you’re interested in other hand tool maintenance, check out our guides on how to cut wood with a hand saw straight and how to change a blade in a utility knife. These tools work best when properly maintained.
Key Takeaway: Sharp chisels dramatically improve woodworking quality, speed, and safety while reducing hand fatigue.
How Should You Store Sharpened Chisels to Maintain Their Edge?
Proper storage prevents edge damage between projects. Never store chisels loose in drawers where they bang together. This immediately dulls edges and can chip bevels. Instead, use edge guards or protective covers. Simple cardboard sleeves work excellently and cost almost nothing. Some woodworkers make wooden chisel rolls that hold chisels safely. Professional storage solutions exist but aren’t necessary for home woodworkers.
Storage best practices include:
- Use edge guards or cardboard sleeves to protect bevels from contact.
- Store chisels vertically in a rack or horizontally in a box with dividers.
- Keep chisels in a dry environment to prevent rust on the steel.
- Avoid storing chisels near moisture or in damp basements.
- Wipe chisels clean after use before storing to remove dust and debris.
- Store chisels away from other tools that might damage the edge.
Preventing Rust and Corrosion
Steel chisels can rust if exposed to moisture. Wipe chisels dry immediately after use. Store them in a dry location away from workshops with high humidity. Some woodworkers apply a thin coat of machine oil to chisel blades for protection. This prevents rust without affecting sharpness. Wipe off excess oil before using the chisel. For chisels stored long-term, light oil coating prevents oxidation.
Key Takeaway: Use edge guards, store chisels in dry locations, and wipe them clean to prevent dulling and rust.
Recommended Products

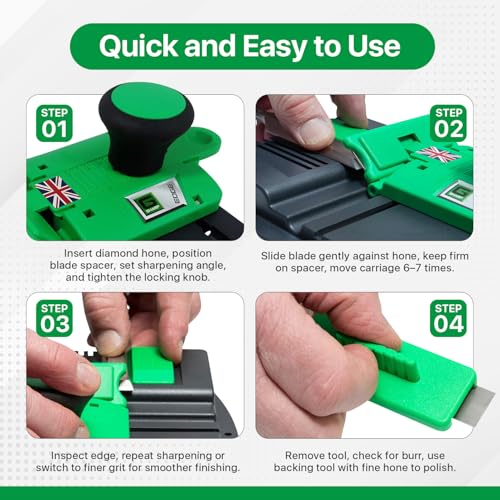
G Sharp Edge Chisel Sharpener - Chisel Sharpening Kit - Sharpens Blades from 3mm to 85mm Wide - Light, Robust and Easily Transported
- Chisel Sharpening Kit; A unique sharpening system allows the user to alter the angle needed to sharpen any square edge chisel or plane from 22 degrees – 90 degrees.
- G Sharp Chisel Sharpener; Our chisel sharpening kit uses 4 Diamond sharpening hones - 200, 400, 800 & 1500. This ensures we are able to get the perfect edge.
- Small And Compact; Our Chisel Sharpening Kit is lightweight, but very robust. It is able to withstand knocking about in your tool bag or even falling off a work bench,
- Simple To Use; No extensive training needed, and so simple even a child could use it. Achievable sharpening is possible for everyone
- Perfect Finish; Include Diamond Micro foils to polish the tool edge. Get a mirror finish on the tool for the ultimate edge.



As an Amazon Associate we earn from qualifying purchases. Product prices and availability are accurate as of the date/time indicated.

Intelitopia Complete Knife Sharpening Stone Set – Dual Grit Whetstone 400/1000 3000/8000 Knife Sharpener with Leather Strop, Flattening Stone, Bamboo Base, 3 Non-slip Rubber Bases & Angle Guide
- 【Complete Knife Sharpening Stone Kit】You don't need to be a Pro to sharpen your blades, all you need is the right tools & technique. All the sharpening tools you need are here, one affordable set for you: 400/1000 & 3000/8000 grit whetstone; Coarse flattening stone; Non-Slip Bamboo base; Knife sharpening angle guide; Leather strop, a simple instruction manual about how to use and what does every component do.
- 【Dual Sided Whetstone】Our wet stone is made of highly durable and professional-grade corundum which is aluminum oxide. 400/1000 grit whetstone to sharpen dull knives, 3000/8000 grit whetstone combination is designed to make your knives razor-sharp & provide extra fine finish/polish on your blades. Coarse flattening stone to keep your whetstone flat all the time. Using the leather strop made of genuine cowhide leather to polish knife and removing burr after sharpening.
- 【Multipurpose】Our professional-grade knife sharpener kit is highly durable & long-lasting. Please choose the appropriate grit stone according to your knife blade. Our whetstone sharpens any blade out there: any kitchen knife set, chef knife, steak knife, santoku knife, paring knife, sushi knife, cleaver knife, Henckels knives, kitchen knives, Japanese knife, butcher knife, paring knife, BBQ knife, Hunting Knife, Pocket Knife, Scissor, straight razors!


As an Amazon Associate we earn from qualifying purchases. Product prices and availability are accurate as of the date/time indicated.
Frequently Asked Questions
How often should I sharpen my wood chisels?
Sharpen chisels after every 2-3 projects for maintenance sharpening, or whenever they feel slightly dull. This frequent approach prevents the frustration of very dull tools. Many professional woodworkers sharpen before every major project. Regular maintenance sharpening takes only 5-10 minutes and keeps edges in peak condition. Waiting until chisels are extremely dull requires extensive resharpening work.
Can I sharpen chisels without a honing guide?
Yes, experienced woodworkers sharpen freehand without guides. However, guides are invaluable for beginners learning proper technique. Guides eliminate angle guesswork and produce consistent results. Once you develop muscle memory through guided sharpening, transitioning to freehand sharpening becomes easier. Many woodworkers use guides for learning, then switch to freehand for speed and flexibility.
What’s the difference between water stones and oil stones?
Water stones cut faster and are popular among modern woodworkers. Oil stones last longer and require less maintenance but cut more slowly. Water stones need flattening more frequently. Oil stones can go longer between flattening. Both produce excellent results—your choice depends on budget, available space, and personal preference. Japanese water stones are highly regarded for chisel sharpening.
Why does my chisel remain dull after sharpening?
The most common causes are inconsistent angle, insufficient sharpening strokes, or a dished stone. Verify your angle is correct using the marker method. Ensure you’re sharpening long enough—sometimes 20-30 strokes per grit isn’t sufficient. Check stone flatness with a straightedge. Finally, confirm you’re using proper pressure and stroking technique. Quality stones also matter—cheap stones cut slowly and unevenly.
How do I know when my chisel is sharp enough?
Paper slicing is the definitive test—truly sharp chisels slice paper cleanly without crushing fibers. The arm hair test also works: sharp edges cut cleanly without pulling. Test on actual wood too: sharp chisels cut end-grain wood cleanly without tear-out. Once you experience a truly sharp chisel, the difference becomes obvious. Dull chisels require excessive force and produce ragged cuts.
Should I sharpen both the bevel and the back of the chisel?
Yes, maintaining a flat back is essential for chisel performance. Sharpen the back edge occasionally to remove burrs and maintain flatness. A flat back ensures the chisel seats properly in joints and produces clean cuts. You don’t need to sharpen the back as frequently as the bevel, but periodic maintenance keeps it flat. Many woodworkers flatten the back every few sharpening sessions.
How Can You Master Wood Chisel Sharpening in 2026?
Mastering wood chisel sharpening requires understanding fundamentals, investing in quality tools, and practicing consistently. Start with proper equipment: quality whetstones, a honing guide, and good lighting. Learn the correct angle for your chisels and commit to maintaining it consistently. Practice the stroking technique until it becomes intuitive. Most woodworkers develop competence within 5-10 sharpening sessions. After that, muscle memory takes over and sharpening becomes second nature.
The investment pays dividends throughout your woodworking journey. Sharp chisels transform your entire experience—work becomes faster, easier, and produces superior results. You’ll notice the difference immediately after sharpening your first chisel properly. This motivation encourages continued practice and skill development. Within weeks, you’ll sharpen confidently and achieve professional-quality edges.
Remember that sharpening is a skill, not a mystical art. Anyone can learn with proper instruction and practice. Don’t be discouraged by initial awkwardness—this is completely normal. Each sharpening session builds skill and confidence. Soon you’ll maintain sharp chisels instinctively, enjoying the superior performance and control they provide. Your woodworking will improve noticeably as sharp tools become your standard.
Key Takeaway: Master chisel sharpening through quality equipment, consistent practice, and regular maintenance to dramatically improve your woodworking results.







Write Your Review
No reviews yet. Be the first to share your experience!