

How to Strip Electrical Wire Safely: Quick Answer
Stripping electrical wire safely requires three core steps: measure and mark your desired length, use the correct wire stripper tool sized for your wire gauge, and apply controlled pressure to remove only the insulation without damaging the copper conductor inside. Always turn off power at the breaker before working with any electrical wiring. Wear safety glasses and insulated gloves. Never strip wire while it’s energized or connected to a live circuit. The entire process takes seconds with proper technique and prevents electrical shock, fires, and damaged conductors that could cause circuit failures.

8-Inch Professional Wire Stripper & Crimper Tool Set
- ✅ 8 inch Professional Wire Stripper: Cuts, strips wire and loops 10-22 AWG Solid copper wire or aluminum cables.high carbon alloy steel with accurate stripping.
- ✅PREMIUM MATERIAL: Crafted from high carbon alloy steel for durability and precision. Ensures accurate stripping and long-lasting performance even with frequent use.
- ✅ Designed Grip Handle:Cutting action combined with ergonomic curved handle, designed non-slip rubber handle, which enables firm grip and eliminates hand fatigue
- ✅ALL-IN-ONE WIRE CRIMPING TOOL: Ideal for crimping both insulated and non-insulated terminals, making it a versatile tool for any electrical job.
- ✅ 24 Month Warranty: Quality assurance. 24 Month warranty and 24/7 customer service for peace of mind. A reliable choice for both professionals and DIY enthusiasts.


As an Amazon Associate we earn from qualifying purchases. Product prices and availability are accurate as of the date/time indicated.
Electrical wire stripping is a fundamental skill for DIY electricians, homeowners, and anyone working on residential or light commercial projects. Whether you’re replacing outlets, installing new lighting fixtures, or building custom cables, knowing how to strip wire correctly saves time and prevents costly mistakes. In July 2026, modern wire strippers have improved ergonomics and precision cutting, making this task easier than ever. This guide covers everything from selecting the right tools to executing perfect strips every single time.
Key Takeaway: Proper wire stripping combines the right tool selection, precise measurement, and controlled technique to protect both your safety and your electrical project’s integrity.
What Tools Do You Need for Stripping Electrical Wire?
The right tools make wire stripping faster, safer, and more professional. A quality wire stripper is non-negotiable—it’s specifically designed to cut insulation without nicking the conductor. Manual wire strippers work for most household projects and cost between fifteen and forty dollars. Automatic wire strippers cost more but require less hand strength and are ideal for high-volume work.
Essential tools for safe wire stripping include:
- Wire stripper (manual or automatic, sized for your wire gauge)
- Safety glasses to protect eyes from flying insulation pieces
- Insulated work gloves for added protection
- Needle-nose pliers for holding small wire sections
- Utility knife as a backup for stubborn insulation
- Ruler or measuring tape for marking strip length
- Marker or pencil for measurement marks
Never use a knife or scissors as your primary wire stripper. These tools slip easily and cause injuries or damage the conductor. Wire strippers have precisely calibrated slots that match standard wire gauges. A utility knife can serve as a secondary option only if your wire stripper isn’t available.
Understanding Wire Gauge and Stripper Sizing
Wire gauge determines the correct stripper size. American Wire Gauge (AWG) runs from 10 (thickest residential wire) to 22 (thinnest household wire). Most wire strippers have multiple holes labeled by gauge number. Using the wrong hole damages either the insulation or the conductor. Always check your wire gauge before selecting the stripper hole.
Key Takeaway: Invest in a quality wire stripper matched to your most common wire gauges and keep safety equipment within arm’s reach.
How Do You Measure and Mark Wire Correctly?
Accurate measurement prevents wasting wire and ensures proper connections. Most electrical connections require one-half inch to three-quarter inch of exposed conductor. Check your specific project requirements—outlet installations, switch connections, and junction boxes have different specifications. Measure from the end of the wire using a ruler or measuring tape.
Follow these measurement steps:
- Measure the required strip length based on your connection type
- Mark the measurement point with a pencil or marker
- Make the mark visible but not so dark it damages the wire
- Double-check your measurement before stripping
- Strip only what you marked—don’t over-strip
Over-stripping creates exposed conductor that can cause shorts or safety hazards. Under-stripping means you won’t have enough exposed wire for proper connections. A simple pencil mark takes seconds and prevents expensive mistakes. Always measure twice before cutting.
Marking Techniques for Different Wire Types
Solid wire and stranded wire require slightly different marking approaches. Solid wire is stiffer and holds marks better, while stranded wire may shift slightly during marking. For stranded wire, wrap a small piece of tape around the wire at your measurement point instead of marking directly. This prevents the insulation from shifting and ensures accurate stripping.
Key Takeaway: Clear, accurate marking takes seconds and prevents costly errors in electrical connections.
What’s the Proper Technique for Stripping Wire Without Damage?
Technique separates professional results from damaged wire. Insert the wire into the correct gauge hole on your stripper until the insulation sits flush against the cutting edges. The wire should feel snug but not forced. Squeeze the stripper handles with steady, controlled pressure—not sudden force. A smooth, consistent squeeze cuts the insulation cleanly.
The correct stripping process involves:
- Insert wire into the matching gauge hole until insulation reaches the cutting edge
- Ensure the wire is fully seated in the hole
- Apply steady, even pressure to the handles
- Rotate the stripper slightly while squeezing for a complete cut
- Pull the wire out smoothly in one motion
- Inspect the conductor for nicks or damage
Common mistakes include using too much force, inserting the wire at an angle, or using the wrong gauge hole. These errors nick the conductor, creating weak points that fail under load or create fire hazards. Gentle, controlled pressure takes slightly longer but produces professional results every time.
Handling Different Wire Insulation Types
Modern insulation varies in thickness and material. THHN wire (individual conductors) has thinner insulation than NM cable (Romex). Older cloth-wrapped or rubber insulation may be stiffer and require slightly more pressure. Test your pressure on a scrap piece first if you’re working with unfamiliar wire types. The insulation should separate cleanly without requiring excessive force.
Key Takeaway: Steady, controlled pressure with the correct gauge hole produces clean insulation removal without conductor damage.
How Do You Handle Multi-Conductor Cables?
Multi-conductor cables like NM cable (Romex) require a different approach than single-conductor wire. These cables contain multiple wires bundled together under one outer jacket. You must strip the outer jacket first, then strip each individual conductor separately. Many modern wire strippers have a dedicated slot for removing outer jacket insulation on NM cable.
Steps for stripping multi-conductor cable:
- Insert the cable into the NM cable slot (usually labeled for 12/2 or 14/2)
- Squeeze gently to cut the outer jacket without nicking inner wires
- Pull the cable through to separate the outer jacket
- Remove the separated outer jacket by hand
- Strip each individual conductor using the appropriate gauge hole
- Remove any paper or filler material inside the outer jacket
The key difference is gentler pressure when cutting the outer jacket. Too much force nicks the inner conductors, creating safety hazards. Practice on a scrap cable first to feel the right pressure. Many electricians use a utility knife for outer jacket removal, but a quality wire stripper with an NM slot is faster and safer.
Protecting Inner Conductors During Outer Jacket Removal
The inner conductors are vulnerable when removing the outer jacket. Support the cable firmly with one hand while stripping with the other. Never twist or bend the cable excessively during jacket removal. If you nick an inner conductor, discard that section of cable and start with fresh wire. A nicked conductor creates a weak point that may fail later.
Key Takeaway: Multi-conductor cables require two-stage stripping: outer jacket first, then individual conductors with proper support and gentle pressure.
What Safety Precautions Must You Follow?
Electrical safety is non-negotiable, even when working with de-energized wire. Always assume a circuit is live until you’ve personally verified it’s off at the breaker. Turn off the main breaker or individual circuit breakers before touching any wiring. Use a non-contact voltage tester to confirm the circuit is de-energized. This takes thirty seconds and prevents electrocution.
Essential safety precautions for wire stripping:
- Turn off power at the breaker before any work
- Test the circuit with a non-contact voltage tester
- Wear safety glasses to protect from insulation fragments
- Wear insulated gloves rated for electrical work
- Never strip live or energized wires
- Keep one hand in your pocket when testing circuits
- Work in dry conditions away from water or moisture
- Keep your work area clean and organized
Personal protective equipment (PPE) protects you from minor injuries that could become serious. Safety glasses prevent insulation fragments from entering your eyes. Insulated gloves provide protection if you accidentally contact a live conductor. These items cost less than twenty dollars and could save your life.
Electrical Hazard Recognition
Understand the hazards you’re working with. Electrical shock can cause cardiac arrest, burns, or nervous system damage. Even low-voltage circuits (under 50 volts) can be dangerous in wet conditions. Never work on electrical systems if you’re tired, distracted, or unfamiliar with the circuit. When in doubt, call a licensed electrician. Your safety is worth more than saving a few dollars.
Key Takeaway: Proper safety precautions—power off, voltage testing, and appropriate PPE—prevent injuries and ensure safe electrical work.
How Do You Inspect and Prepare Stripped Wire for Connection?
After stripping, inspect the exposed conductor before making any connection. The copper should be shiny and clean without nicks, cuts, or discoloration. Black or green discoloration indicates oxidation that interferes with electrical connections. A small nick can create a weak point that overheats or fails. If the conductor is damaged, cut off that section and strip fresh wire.
Inspection checklist for stripped wire:
- Check for nicks, cuts, or gouges in the conductor
- Look for black, green, or discolored spots indicating oxidation
- Verify the insulation is cleanly separated without tears
- Ensure the exposed length matches your project requirements
- Confirm the conductor is straight and not bent
- Remove any remaining insulation fragments
Clean oxidized conductor with fine-grit sandpaper or a wire brush. Light cleaning takes seconds and ensures excellent electrical contact. For heavily oxidized wire, strip a fresh section instead. The small amount of extra wire is worth the safety and reliability improvement. Never use corroded conductor in critical connections like main panel work.
Preparing for Terminal Connection
Different terminals require different conductor preparations. Screw terminals need slightly curled conductor that wraps around the screw. Push-in terminals need straight, unbent conductor. Crimp terminals require specific conductor length and straightness. Check your specific terminal type before preparing the wire. A few seconds of preparation prevents loose connections that overheat and create fire hazards.
Key Takeaway: Thorough inspection and proper preparation ensure reliable electrical connections that perform safely for years.
What Common Mistakes Should You Avoid?
Learning from common mistakes prevents frustration and safety hazards. The most frequent error is using the wrong stripper size, which either nicks the conductor or fails to cut the insulation. Another common mistake is over-stripping, leaving too much exposed conductor that creates short-circuit hazards. Under-stripping leaves insufficient conductor for proper connections, requiring you to re-strip the same wire section.
Common wire stripping mistakes to avoid:
- Using the wrong gauge hole in your wire stripper
- Applying excessive force that damages the conductor
- Stripping too much insulation, creating safety hazards
- Stripping too little, requiring re-stripping of the same section
- Using damaged or dull wire stripper blades
- Stripping live or energized wires
- Ignoring oxidation or discoloration on the conductor
- Failing to support multi-conductor cables properly
Replace worn stripper blades immediately. Dull blades require excessive pressure and damage wire. Most wire strippers have replaceable blades that cost five to fifteen dollars. Investing in blade replacement prevents frustration and poor results. Quality tools make this task easier and safer every single time.
Learning from Practice
Start with practice strips on scrap wire before working on your actual project. This builds muscle memory and helps you feel the correct pressure. Scrap wire is free or costs pennies per foot at electrical supply stores. Ten minutes of practice produces noticeably better results than jumping directly into your project. Professionals practice their technique constantly to maintain perfect results.
Key Takeaway: Avoiding common mistakes through proper tool selection, correct technique, and practice prevents damage and safety hazards.
Recommended Products
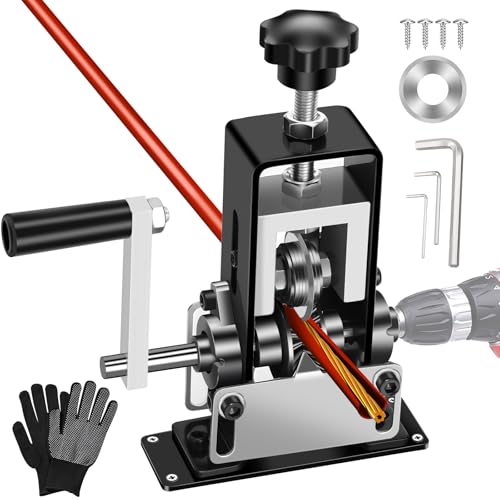
Trivd Frol Manual Wire Stripping Machine, Gauge Wire 0.06"-1"
- 【Easy Wire Stripping】: Our wire stripper machine streamlines the wire stripping process, saving time and effort. Ideal for both DIY enthusiasts and professionals, its adjustable settings ensure precise and clean wire stripping, minimizing the risk of wire damage.
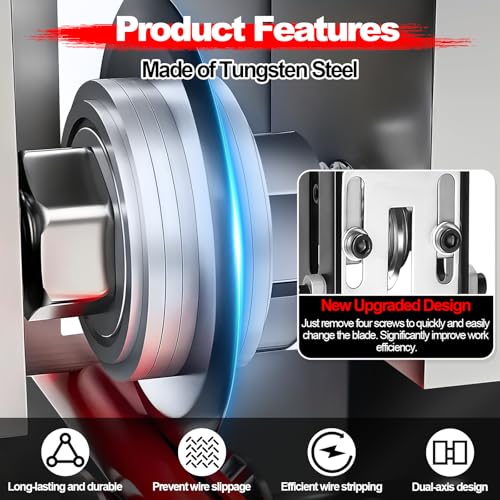
- 【Quickly Change Blade】: New Upgraded Design - Just remove four screws to quickly and easily change the blade. Significantly improve work efficiency. In addition to the blade that come with the machine, we also provide an extra replacement blade.
- 【Premium Material】: The wire stripper for drill is made of aluminum alloy and stainless steel. It is equipped with a tungsten steel blade, which is very sharp, strong and durable, ensuring that it can be cut clean in one go.
- 【Dual-drive Design】: This copper wire strippers provide the flexibility of both motor-driven and hand-cranked operation. You can easily operate it manually with the hand crank. It can also be connected to an electric drill via a connector for drill driving operation.
- 【Suitable for Varous Sizes of Wires】: The wire stripping tool includes various sized feeding holes, accommodating wire diameters from 0.06" to 1"(1.5mm to 25mm). Adjust the blade up and down by twisting the regulating nut, making it suitable for different cable sizes.
- 【Important Note】: Each product receives a protective oil coating before leaving the factory to ensure optimal performance. Minor scratches during transportation are normal. Our blades are hardened to enhance strength and durability, extending their lifespan.


As an Amazon Associate we earn from qualifying purchases. Product prices and availability are accurate as of the date/time indicated.

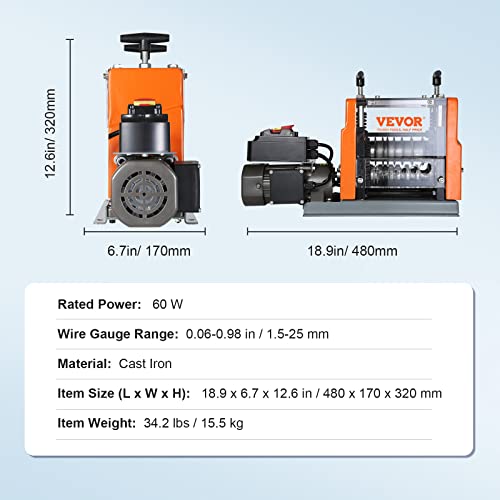
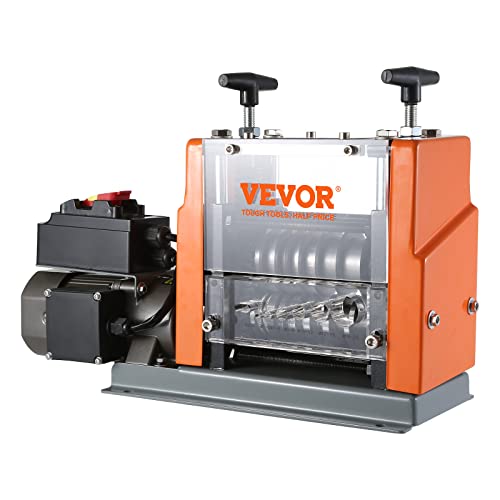
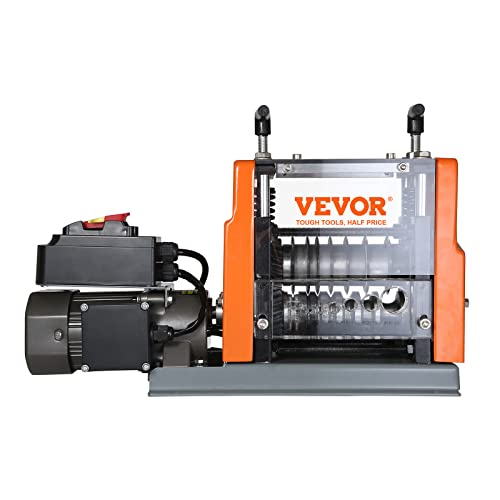
VEVOR Electric Wire Stripping Machine 0.06"-0.98" Automatic Wire Stripper
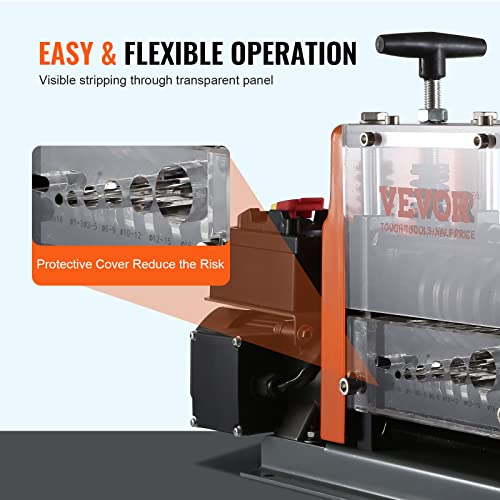
- High Efficient Stripping: The VEVOR wire stripping machine adopts a 60 W gear motor, which is powerful as the strong 180 W motor but compact. The gearbox leads to fast stripping speed, plus the hands-free design increases security and convenience. Widely used in cable/wire manufacturers, recycling plants, and copper products factories.
- See and Focus: Looking for a wire peeler machine that will stand the test of time? Look no further than this baby! With a sturdy cast iron body and a clear acrylic panel, you'll be able to see exactly what's going on during the stripping process. Plus, its non-deformed structure means it'll keep going strong for years to come. Say goodbye to frustrating wire stripping experiences and hello to convenience and reliability!
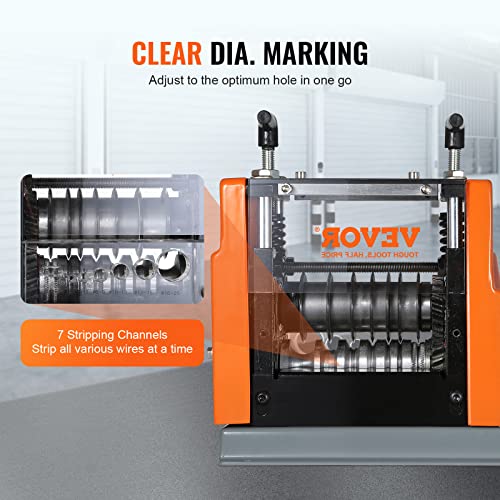
- Wide Compatibility: The VEVOR wire stripper machine has 7 stripping holes, including 6 round channels and 1 flat slot. Adjust the blade to fit all wires with a diameter from 0.06'' (1.5 mm) to 0.98'' (25 mm). Suitable for handling hard cover wires, soft cover wires, multi-conductor wires, mono-filament wires, etc.
- Upgraded Stripping Structure: The electric wire stripper machine is added with hole-size markings. Different size wires can be stripped precisely without repeated adjustments, making it easier and quicker to strip the wires. Also, the blade is made of 65 mn spring steel for ultra strength and hardness, extending the life of the blades.
- Complete Accessories: We want you to feel confident while using our copper stripper, which is why we've included a pair of gloves to protect your hands from dirt and injury. But that's not all! We've also supplemented the instructions with tips on the perfect stripping angle, so even if it's your first time, you can jump right in and start stripping copper like a pro! With our user-friendly design and helpful extras, you'll be a wire-stripping whiz in no time!






As an Amazon Associate we earn from qualifying purchases. Product prices and availability are accurate as of the date/time indicated.
Frequently Asked Questions
Can you strip electrical wire with a utility knife?
A utility knife can remove insulation in emergencies, but it’s not ideal for regular work. Wire strippers are specifically designed for this task and prevent conductor damage. A knife easily slips and nicks the copper inside. If you must use a knife, make shallow cuts around the insulation circumference, then carefully peel it away. Always use a proper wire stripper when available.
How much insulation should you strip from electrical wire?
Most electrical connections require one-half to three-quarter inch of exposed conductor. Check your specific terminal or connection type for exact requirements. Screw terminals typically need three-quarter inch, while push-in terminals need one-half inch. Over-stripping creates short-circuit hazards. Under-stripping means insufficient conductor for proper connection. Always measure and mark before stripping.
What do you do if you nick the conductor while stripping?
A small nick may be acceptable if the conductor is still structurally sound. However, deep cuts or gouges create weak points that overheat or fail. For critical connections, discard the damaged section and strip fresh wire. The cost of new wire is minimal compared to potential electrical fires or system failures. When in doubt, use undamaged conductor.
Is it safe to strip old electrical wire?
Old insulation can be brittle, stiff, or contain hazardous materials like asbestos. If you’re unsure about the wire age or composition, have it tested by a professional. Cloth-wrapped or rubber insulation from pre-1960s installations may require special handling. Modern PVC insulation is safe to work with. Always wear gloves and safety glasses when stripping any wire.
How do you strip fine stranded wire without damaging it?
Fine stranded wire requires extra care because individual strands are delicate. Use a wire stripper sized for fine stranded wire if available. Apply gentle, steady pressure rather than sudden force. Support the wire firmly with needle-nose pliers to prevent twisting. Some electricians wrap tape at the measurement point instead of marking directly on fine stranded wire.
What’s the best wire stripper for a homeowner?
A manual wire stripper with holes for 10 AWG through 22 AWG covers most household projects. Quality options cost twenty to forty dollars and last for years. Look for comfortable handles and clearly labeled gauge holes. Automatic strippers cost more but reduce hand fatigue on large projects. Start with a basic manual stripper and upgrade if you do frequent electrical work.
How Can You Improve Your Wire Stripping Skills Over Time?
Mastery comes through consistent practice and attention to technique. Each wire you strip teaches you something about pressure, angle, and timing. Keep a notebook of the wire types you work with most frequently and your preferred stripper settings. Over time, you’ll develop muscle memory that makes perfect strips automatic. Professional electricians perform hundreds of strips per day and achieve flawless results through repetition.
Ways to improve your wire stripping technique:
- Practice on scrap wire before important projects
- Keep detailed notes about different wire types and gauges
- Experiment with different stripper models to find your preference
- Watch experienced electricians and learn their techniques
- Invest in quality tools and maintain them properly
- Clean and inspect your work after every strip
- Join online communities and forums for tips and feedback
Related DIY skills complement wire stripping knowledge. Learning to use a socket wrench set helps with panel work, while driving nails without bending teaches precision technique. Each skill builds on previous knowledge. Continuous learning keeps your DIY abilities sharp and expands your project capabilities.
Key Takeaway: Consistent practice with attention to technique develops the muscle memory and judgment that produce perfect results every time.
Is Wire Stripping a Skill Worth Learning in 2026?
Absolutely. Wire stripping remains essential for any homeowner tackling electrical projects. Modern tools have improved since previous years, making this task easier and safer than ever. Whether you’re installing new outlets, replacing light fixtures, or building custom cables, proper wire stripping ensures reliable, safe electrical connections. This fundamental skill opens doors to countless DIY electrical projects that save money and build confidence.
The value of learning wire stripping extends beyond individual projects. Understanding proper technique prevents expensive mistakes and dangerous electrical hazards. A single electrical fire could cost tens of thousands in property damage and insurance increases. The few minutes spent learning correct technique pays for itself many times over. Additionally, this skill impresses friends and family when you tackle electrical improvements yourself.
Invest in quality tools, practice on scrap wire, and follow safety precautions religiously. Start with simple projects like replacing outlets or light switches. As your confidence grows, tackle more complex electrical work. Always turn off power, test circuits, and wear appropriate safety equipment. With proper technique and respect for electrical hazards, you’ll master wire stripping and complete electrical projects with professional-quality results.
Key Takeaway: Wire stripping is an essential, learnable skill that enables safe, reliable electrical projects and prevents costly mistakes or hazards.







Write Your Review
No reviews yet. Be the first to share your experience!