

How to Adjust Fan Pattern on an HVLP Spray Gun: Quick Answer
Adjusting the fan pattern on an HVLP spray gun controls the width and shape of your spray output, directly impacting paint coverage and finish quality. Most HVLP guns feature a fan pattern adjustment knob located on the gun’s side or back that you rotate clockwise to widen the spray or counterclockwise to narrow it. Proper fan pattern adjustment is essential for achieving professional results, whether you’re painting furniture, cabinets, or automotive surfaces. The adjustment works in conjunction with fluid and air pressure settings to deliver optimal atomization and coverage.

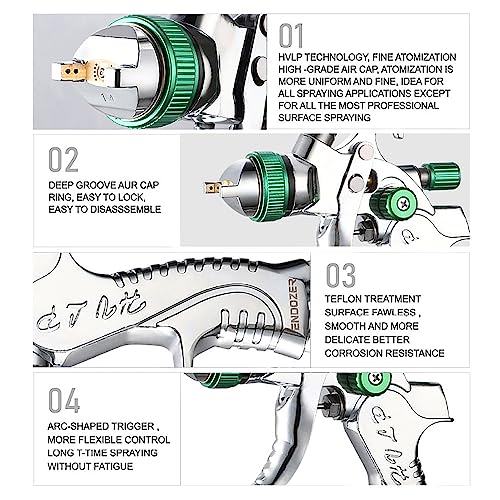
ENDOZER HVLP Gravity Feed Spray Gun Kit with 3 Nozzles
- This spray gun is supplied with a 20 oz. (600 ml) gravity feed cup, with 1.4 1.7 2.0mm real stainless steel nozzle and needle.
- The hvlp spray gun hood is made of brass, wear-resistant and corrosion-resistant, 15 holes design, uniform atomization, excellent effect. 1/4 "NPT inlet and quick adapter of the same specification.
- Fluid control adjusts the amount of spray paint, pattern control adjusts the fan pattern size, and the air conditioning valve provides the ability to adjust the air flow rate. It is designed to provide uniform spraying and particle size for all types of surface coatings.
- In the painting process effective paint filter(product contains) recommended to reduce any small pieces of dried paint or pollutant in the fluids to ensure a perfect finish. In addition, this air spray gun case also includes accessories such as air pressure gauge, quick adapter set, etc., Compatible with various usage scenarios.
- Endozer spray paint gun can be used for various purposes such as furniture repair, mural painting, car painting, painting, arts and crafts, paint coating of industrial products, spray paint of factories, and model making. HVLP air spray gun that is easy to use even for beginners


As an Amazon Associate we earn from qualifying purchases. Product prices and availability are accurate as of the date/time indicated.
Understanding your specific HVLP gun model is crucial since different manufacturers design their controls differently. Some guns use a single knob, while others feature separate controls for horizontal and vertical spray patterns. Always start with a narrow pattern and gradually widen it until you find the sweet spot for your project. Testing on scrap material before applying paint to your final surface prevents costly mistakes and ensures consistent results throughout your job.
Key Takeaway: The fan pattern knob controls spray width; rotate it to match your project needs and always test on scrap material first.
What Does the Fan Pattern Control on an HVLP Spray Gun Do?
The fan pattern adjustment determines how wide or narrow your paint spray disperses as it leaves the gun nozzle. A wider fan pattern covers more surface area with each pass, making it ideal for large, flat surfaces like doors or panels. A narrower pattern concentrates the spray into a tighter beam, perfect for detailed work, trim, and tight corners where precision matters most.
Fan pattern control directly affects your spray gun’s efficiency and finish quality. Wider patterns reduce the number of passes needed but require more paint and air pressure. Narrower patterns use less material but demand more time and multiple overlapping passes to achieve complete coverage.
- Wide patterns: ideal for large flat surfaces, faster coverage, requires more paint
- Narrow patterns: perfect for detail work, uses less material, takes more time
- Medium patterns: balanced option for general-purpose painting tasks
- Controls spray shape: horizontal, vertical, or circular depending on adjustment
How Fan Pattern Differs from Fluid Control
Many beginners confuse fan pattern adjustment with fluid control, but they serve different purposes. The fan pattern knob adjusts spray width and shape, while the fluid control knob regulates paint volume flowing through the nozzle. You need both working together for optimal results. Adjusting fan pattern without proper fluid control leads to uneven coverage or wasted paint.
Think of it this way: fan pattern determines your spray’s footprint, while fluid control fills that footprint with paint. If you have a wide fan pattern but low fluid flow, you’ll get thin, patchy coverage. Conversely, a narrow pattern with high fluid flow creates thick drips and runs. Mastering both controls together is what separates amateur from professional results.
Key Takeaway: Fan pattern controls spray width; fluid control regulates paint volume—both must work together for professional finishes.
How Do You Locate and Identify the Fan Pattern Adjustment Knob?
Finding the fan pattern adjustment knob depends on your specific HVLP gun model. Most modern spray guns position this control on the side or rear of the gun body, easily accessible while holding the trigger. The knob is typically smaller than the fluid control knob and marked with arrows or lines indicating rotation direction for wider or narrower spray patterns.
Check your gun’s user manual first—it provides exact locations and operating instructions specific to your model. If you’ve lost the manual, manufacturer websites usually offer downloadable PDF versions. Spend a few minutes familiarizing yourself with your gun’s layout before your first spray session.
- Location: typically on gun’s side, rear, or near the air cap
- Appearance: smaller knob with directional markings or arrows
- Feel: rotates smoothly with moderate resistance
- Markings: often labeled with “wide,” “narrow,” or directional arrows
Understanding Different Gun Designs
HVLP spray guns come in various designs, each with slightly different control layouts. Gravity-feed guns mount the paint cup on top, making side controls more accessible. Siphon-feed guns have the cup below, sometimes affecting control positioning. Pressure-feed systems use remote cups, giving manufacturers more freedom in gun design.
Some professional-grade guns feature dual controls for separate horizontal and vertical fan pattern adjustment. This advanced feature allows you to create custom spray patterns suited to specific applications. Entry-level guns typically have a single combined control that adjusts overall spray width. Understanding your gun’s design helps you use it more effectively.
Key Takeaway: Fan pattern knob location varies by model; always consult your manual for exact positioning and control layout.
What Are the Steps to Properly Adjust Fan Pattern Settings?
Adjusting your HVLP spray gun’s fan pattern follows a systematic process that ensures optimal results. Begin with your gun unpressurized and empty of paint. Locate the fan pattern knob and note its current position. Most manufacturers recommend starting with a narrower pattern and gradually widening it based on your project needs.
Here’s the proper adjustment sequence:
- Step 1: Ensure the gun is disconnected from air and empty of paint
- Step 2: Locate the fan pattern adjustment knob on your gun
- Step 3: Rotate counterclockwise to narrow the spray pattern
- Step 4: Rotate clockwise to widen the spray pattern
- Step 5: Reconnect air and test on scrap material
- Step 6: Make fine adjustments based on test results
Testing Your Adjustments on Scrap Material
Never test fan pattern adjustments on your final project surface. Always use scrap wood, cardboard, or old panels to verify your settings first. This practice saves expensive materials and prevents finishing mistakes. Spray test patterns from the same distance you’ll use on your actual project—typically six to eight inches from the surface.
Watch how the paint distributes across your test surface. A good spray pattern shows even coverage with a slightly darker center and lighter edges. If you see heavy center concentration with thin edges, your fan pattern is too narrow or your fluid control is too high. Adjust accordingly and test again before moving to your actual project.
Key Takeaway: Always test fan pattern adjustments on scrap material before spraying your final project.
How Do You Optimize Fan Pattern for Different Project Types?
Different painting projects require different fan pattern settings to achieve professional results. Large flat surfaces like cabinet doors or panels benefit from wider fan patterns that cover more area per pass. Detailed work, trim, and corners need narrower patterns for precision and control. Understanding these distinctions helps you work more efficiently and produce higher-quality finishes.
Project type directly influences your fan pattern choice. Automotive work typically uses medium to wide patterns for body panels but narrow patterns for trim and detail work. Furniture finishing often requires narrow patterns for precision, especially on decorative pieces. Cabinet painting might use wider patterns for door panels but narrow patterns for frame edges.
- Flat surfaces: wide pattern (8-10 inches at 6 inches distance)
- Detailed work: narrow pattern (2-4 inches at 6 inches distance)
- Trim and edges: medium to narrow pattern (4-6 inches)
- Corners and crevices: very narrow pattern (1-3 inches)
- Large panels: wide pattern for speed and efficiency
Balancing Speed with Quality
Wider fan patterns complete projects faster but require more paint and careful technique to avoid drips. Narrower patterns use less material but demand multiple overlapping passes and more time. The best approach balances your timeline with material costs and desired finish quality. For most projects, starting with a medium pattern offers a good compromise between speed and precision.
Consider your skill level too. Beginners often achieve better results with narrower patterns that give more control, even if it takes longer. As you gain experience, you can confidently use wider patterns and faster techniques. Your comfort level with the gun should influence your fan pattern choice.
Key Takeaway: Match fan pattern width to your project type: wide for flat surfaces, narrow for detail work.
What Common Mistakes Should You Avoid When Adjusting Fan Pattern?
Many spray gun users make predictable mistakes when adjusting fan patterns, leading to poor results and wasted materials. The most common error is failing to test adjustments before spraying the final project. Another frequent mistake involves adjusting fan pattern without also checking fluid and air pressure settings. These controls work together; changing one without considering the others creates imbalanced spray characteristics.
Avoid these typical fan pattern adjustment mistakes:
- Testing on final surfaces instead of scrap material
- Making multiple adjustments without testing between changes
- Ignoring fluid control and air pressure when adjusting fan pattern
- Using the same pattern for all project types
- Failing to consult your gun’s manual for specific instructions
- Over-rotating the knob, which can damage internal components
Preventing Spray Pattern Problems
Spray pattern problems often stem from incorrect adjustment rather than equipment failure. If your spray appears uneven or concentrated, check your fan pattern setting first. A pattern that’s too narrow creates a concentrated center with thin edges. Conversely, a pattern that’s too wide may appear thin overall if your fluid control is too low.
Keep detailed notes about your settings for each project type. Write down which fan pattern, fluid control, and air pressure combination produced the best results. This documentation becomes invaluable when you return to similar projects. Over time, you’ll develop a mental library of optimal settings for your gun and common applications.
Key Takeaway: Test adjustments on scrap material, never on final surfaces, and document settings that work well.
How Does Fan Pattern Relate to Paint Viscosity and Air Pressure?
Fan pattern adjustment doesn’t exist in isolation—it works as part of an integrated system including paint viscosity and air pressure. Thinner paint atomizes better and allows wider fan patterns without quality loss. Thicker paint requires narrower patterns to ensure proper atomization and even coverage. Your air pressure setting also influences how effectively the fan pattern distributes paint.
Higher air pressure atomizes paint more aggressively, which can work with wider fan patterns. Lower air pressure requires narrower patterns to maintain proper paint distribution. If you’re experiencing poor spray results, the problem might not be your fan pattern adjustment—it could be paint viscosity or air pressure. For detailed guidance on thinning paint properly, refer to our complete guide on thinning paint for HVLP guns.
- Thin paint: supports wider fan patterns, better atomization
- Thick paint: requires narrower patterns, poor atomization risk
- High air pressure: enables wider patterns, more aggressive atomization
- Low air pressure: needs narrower patterns, gentler atomization
Creating the Perfect Balance
Professional results come from balancing all three variables: fan pattern, paint viscosity, and air pressure. Start by setting your air pressure according to your gun’s specifications—usually 25-30 PSI for HVLP systems. Thin your paint to the manufacturer’s recommended viscosity using a viscosity cup if available. Then adjust your fan pattern based on your project needs.
Make one adjustment at a time and test thoroughly before proceeding. If you adjust fan pattern, air pressure, and fluid control simultaneously, you won’t know which change caused any improvement or problem. This methodical approach builds your understanding of how your gun operates and helps you troubleshoot issues more effectively.
Key Takeaway: Fan pattern works with paint viscosity and air pressure; adjust one variable at a time and test thoroughly.
What Maintenance Keeps Your Fan Pattern Adjustment Working Smoothly?
Regular maintenance ensures your fan pattern adjustment knob remains responsive and accurate throughout the gun’s lifespan. After each use, wipe the exterior of your gun with a clean, damp cloth to remove paint overspray. Pay special attention to the fan pattern knob area, which can accumulate dried paint and debris. Never force the knob if it feels stuck—gently clean around it first.
Proper cleaning extends your gun’s life and maintains precise control. For comprehensive cleaning guidance, check our complete guide on cleaning air spray guns. Store your gun in a clean, dry location away from dust and temperature extremes. Periodically test your fan pattern adjustment to ensure it still functions smoothly without resistance or grinding sensations.
- Wipe gun exterior after each use with damp cloth
- Clean around the fan pattern knob carefully
- Never force stuck knobs; clean gently instead
- Store gun in dry, dust-free location
- Test adjustment knob periodically for smooth operation
Troubleshooting Adjustment Issues
If your fan pattern knob becomes stiff or unresponsive, dried paint is likely the culprit. Soak the gun’s exterior in warm water for several minutes, then gently clean around the knob with a soft brush. Avoid submerging the entire gun in water, which can damage internal components and seals. If cleaning doesn’t restore smooth operation, consult your gun’s manual for internal adjustment procedures or contact the manufacturer.
A grinding sensation when rotating the knob indicates internal damage requiring professional service. Never continue using a gun with mechanical problems, as this can worsen damage and affect spray quality. Most manufacturers offer repair services or replacement parts, making professional help more affordable than you might expect.
Key Takeaway: Clean your fan pattern knob regularly and never force stuck adjustments—gentle cleaning usually solves the problem.
How Do You Set Up Your HVLP Spray Gun for Success?
Proper setup before your first spray pass ensures optimal fan pattern performance. Begin by reviewing your gun’s manual and understanding all control locations. Prepare your workspace with adequate ventilation, proper lighting, and drop cloths or masking. Thin your paint to the correct viscosity and fill your cup or reservoir according to manufacturer instructions.
For complete setup guidance, consult our comprehensive HVLP spray gun setup guide. Connect your gun to your air compressor with appropriate hose and fittings. Set your air pressure to the manufacturer’s recommended level, typically 25-30 PSI for HVLP systems. Begin with a narrow fan pattern and gradually adjust based on your project requirements.
- Read gun manual thoroughly before first use
- Prepare workspace with ventilation and drop cloths
- Thin paint to correct viscosity
- Connect to air compressor with proper hose
- Set air pressure to manufacturer specifications
- Start with narrow pattern and adjust as needed
Key Takeaway: Thorough preparation and understanding your gun’s specifications lead to successful fan pattern adjustment and professional results.
Recommended Products
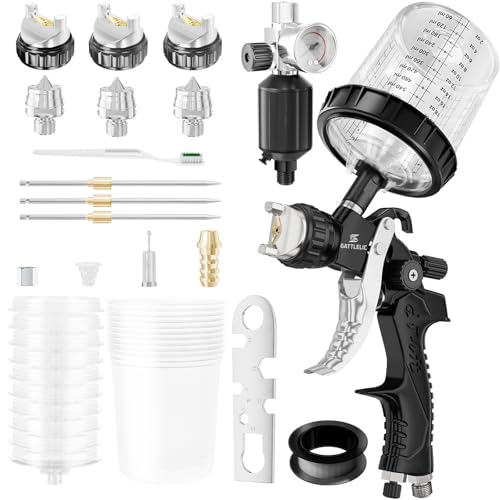
HVLP Air Spray Gun with 1.4/1.7/2mm Nozzles & Air Compressor Regulator, Air Spray Paint Gun w/10pcs 600cc Mixing Cup and Lids, Automotive Paint Sprayer for Car, House Painting, Furniture
- 【Professional Spray Gun】Working Pressure: 2.5-3.5bar; Spraying Distance: 170-240mm; Air Consumption: 275L/min; Paint Capacity: 600cc. The hvlp spray gun saves 20% of paint, the paint utilization rate is up to 65%, and the spraying width is 240mm, which provides the best performance. 1/4" NPT inlet and the same size quick adapter.
- 【2-in-1 Air Compressor Filter Regulator 】Air pressure regulators with a reusable filter for easy setting and control of Air pressure, the spray gun regulator is both heavy-duty and space-saving, making it ideal for automotive paint applications.
- 【High Precision Atomization】The spray paint gun cover is made of brass, and the 15-hole hood is processed by precision machining to achieve high atomization effect. The paint sprayer can adjust the amount and amplitude of spray paint, and the air conditioning valve provides the ability to adjust the air flow rate. It provides uniform spraying for all types of surface coatings.
- 【Adjustable Nozzles】The air spray gun is equipped with three different sizes of tips (1.4mm, 1.7mm, 2.0mm). Note: 1.4mm nozzles is already installed in the spray gun.1.4mm tip is ideal for topcoats, 1.7mm tip is perfect for primers, and 2.0mm tip is better suited for large area applications.NOTE: Replacing the nozzle requires replacing the corresponding needle as well! Avoid leakage!
- 【Cost and Labor Savings】The package of paint gun contains: 1*car paint gun, 3 kinds of nozzles, 10*disposable cups, 1*regulator, 1*brush, 1*wrench, 1*sealing tape. By using the disposable cup system, it reduces the waste of paint materials and cleaning solvents while eliminating the cost and labor of cleaning traditional automotive spray gun cups.
- 【Wide Range of Applications】The mini paint sprayer makes spraying softer, easier to control and reduces overspray. Suitable for spraying primers, clear coats and other high viscosity coatings, as well as primers, topcoats and detail coats for the automotive industry and furniture.
- 【GATTLELIC Guarantee】If there is any problem about our product, feel free to contact us and our professional service team will help you until problems solved.


As an Amazon Associate we earn from qualifying purchases. Product prices and availability are accurate as of the date/time indicated.

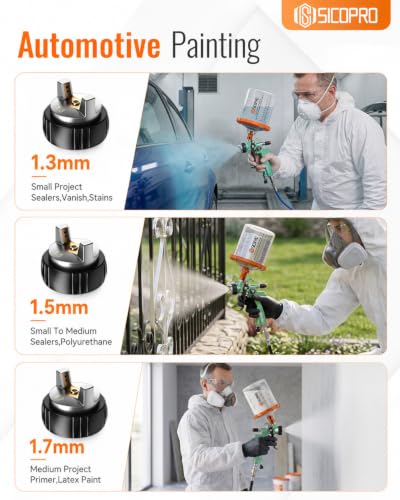
Sicopro LVLP Spray Gun, Automotive Paint Gun With10 Disposable Paint Cups
- SMOOTH SPRAY PAINT EFFECT: The nozzle adopts micrometer level processing technology to optimize the internal metal surface roughness, can make an even and fine atomization performance and excellent spraying effect, and stable spray pattern can be
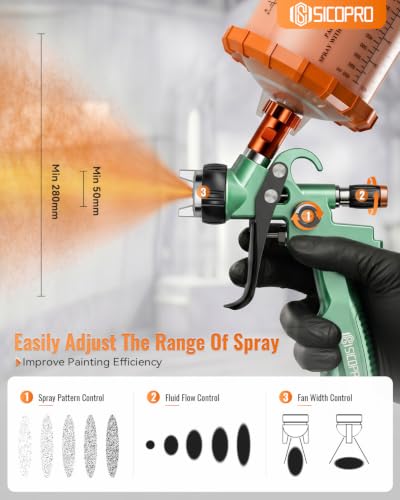
- QUICKLY COMPLETE THE SPRAYING WORK: The spray width of SICOPRO pneumatic spray gun can be adjusted as required, and the maximum spray width can reach 280mm, which greatly improves the painting efficiency and saves working time
- SAVE YOU EXPENSIVE PAINT: The precision machined brass nozzle and one-piece forged aluminum gun body, enable smooth spraying of paint to achieve uniform atomization,Make our paint utilization rate higher than regular spray gun, reaching 65% and reducing environmental pollution and saving paint
- EASY TO CLEAN: The spray gun body is treated with Teflon technology, which has a corrosion resistant and not stained with dust.You can soak it in cleaning solution for 10 hours without worrying about damage to the gun body ,and you only need to soak it for 10 minutes to dissolve the paint, which can be easily cleaned with a cleaning brush
- EASY TO USE: SICOPRO Spray paint gun with clearly marked scales and labels on the body can accurate adjustment the amount and amplitude of spray paint for quick operation, . Our quick start-up guide, instruction manual and videos help beginner operate like a pro and start quickly




As an Amazon Associate we earn from qualifying purchases. Product prices and availability are accurate as of the date/time indicated.
Conclusion: Mastering Fan Pattern Adjustment for Professional Results
Adjusting the fan pattern on your HVLP spray gun is a fundamental skill that separates amateur work from professional-quality finishes. The fan pattern knob controls spray width and shape, directly impacting coverage efficiency and finish quality. By understanding how to locate this control, make proper adjustments, and test your settings on scrap material, you’ll dramatically improve your spray painting results.
Success requires balancing fan pattern adjustment with paint viscosity and air pressure settings. Start with a narrow pattern and gradually widen it based on your project type and personal comfort level. Document settings that work well for future reference, building your expertise over time. Regular maintenance keeps your adjustment knob responsive and ensures consistent performance throughout your gun’s lifespan.
Whether you’re painting furniture, cabinets, automotive surfaces, or trim work, mastering fan pattern adjustment gives you the control needed to produce professional results. Take time to practice on scrap material, understand your specific gun’s design, and develop a systematic approach to adjustment. With these skills in place, you’ll tackle any spray painting project with confidence and achieve finishes that rival professional work.







Write Your Review
No reviews yet. Be the first to share your experience!