

How Do You Connect an Air Nailer to a Compressor? Quick Answer
Connecting an air nailer to a compressor involves three essential steps: attach an air hose to the compressor outlet using a quick-connect coupler, connect the hose to the nailer’s inlet, and adjust the pressure regulator to match your nailer’s requirements. Most nailers operate between 70 and 90 PSI. Always check your nailer’s manual for exact pressure specifications. Ensure the compressor is powered off before making connections. Use Teflon tape on threaded connections to prevent air leaks. The entire process takes just a few minutes once you understand the basic components and safety protocols.

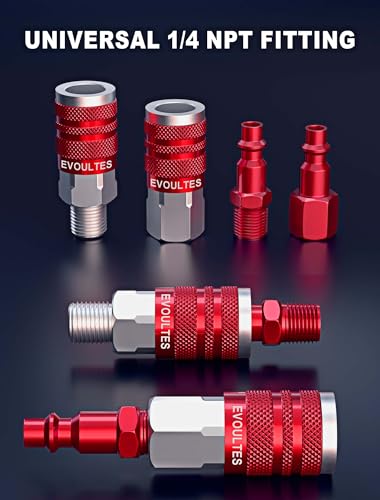
16 Pack Universal 1/4" NPT Air Hose Fittings Kit, Quick Connect Couplers
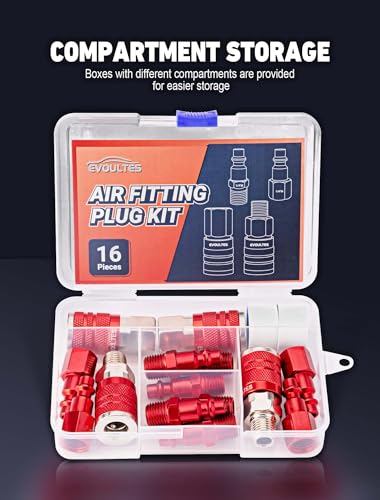
- 【16 PCS Air Fittings】: EVOULTES Series 16 Piece air hose couplers and plugs fittings set with 2PCS 1/4 inch FNPT universal air coupler, 2PCS 1/4 inch MNPT universal air coupler, 6PCS 1/4 inch MNPT air plug, 4PCS 1/4 inch FNPT air plug, 2PCS teflon tape.
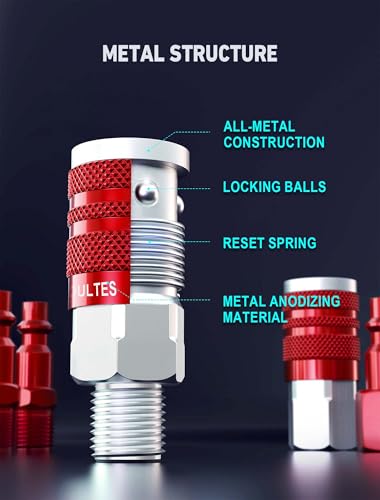
- 【Quick Connect Air Hose Fitting】: Quick Connect Air Hose Fitting better grip when connecting and disconnecting; sleeve guard helps reduce the risk of accidental disconnection and protects the coupler sleeve. Two extra sealing rubber rings reduce thread clearance and prevent air leakage.
- 【Metal Anodizing Material】: 4 Pcs coupler made of metal, 10 Pcs fitting made of aluminium oxide ,higher strength and durability, they are less prone to wear and tear, corrosion resistant, and can withstand high pressure from pneumatic tools and equipment without leaking.
- 【Easy Connection & Release】: There is 4 locking balls in the coupler which hold the plug securely, Push-on style coupler, insert plug into coupler for fully automatic, quick coupling action.
- 【Wide Application】: Maximum pressure resistance of up to 300PSI, this air coupler plug kit is ideal for auto repair shops, individuals. The air fittings can be connected to air hoses, air compressor fittings, air compressor attachments and pneumatic air tools such as blowguns, nail guns, spray guns, inflatable accessories etc.



As an Amazon Associate we earn from qualifying purchases. Product prices and availability are accurate as of the date/time indicated.
Setting up pneumatic tools correctly is critical for both safety and performance. A properly connected air nailer delivers consistent power, reduces fatigue during extended work sessions, and minimizes the risk of accidents. Whether you’re a professional contractor or a weekend DIY enthusiast, mastering this fundamental skill opens doors to faster, more efficient fastening work. Understanding the connection process also helps you troubleshoot problems quickly and maintain your equipment properly for years of reliable service.
What Equipment Do You Need to Connect an Air Nailer?
Before connecting your air nailer to a compressor, gather all necessary components. The foundation of your setup includes a functioning air compressor with adequate tank capacity and output pressure. Most pneumatic nailers require compressors rated for at least 2 to 4 cubic feet per minute (CFM) at the nailer’s operating pressure. You’ll also need a high-quality air hose rated for the pressure your compressor produces.
Essential components for a safe connection include:
- Air hose with quick-connect couplers on both ends.
- Air pressure regulator to control output pressure.
- In-line air filter to remove moisture and debris.
- Teflon tape for sealing threaded connections.
- Moisture trap or water separator for air quality.
- Air hose storage reel or rack.
Many professionals recommend purchasing a complete air compressor kit that includes a regulator, filter, and coupler system. These kits simplify the setup process and ensure all components are compatible. Check your nailer’s manual for specific pressure and CFM requirements before purchasing equipment. Investing in quality components prevents leaks, maintains consistent pressure, and extends the lifespan of your tools.
Key Takeaway: Proper equipment selection ensures safe, efficient connections and reliable nailer performance.
What Are the Step-by-Step Connection Instructions?
The actual connection process is straightforward when you follow a logical sequence. Start by turning off your air compressor completely and releasing any pressure in the tank. This safety step prevents accidental air discharge during setup. Locate the air outlet valve on your compressor—this is typically a brass fitting on the tank’s side or top. If you haven’t already installed a regulator and filter assembly, do so now by screwing these components onto the compressor outlet.
Connecting the Air Hose
Attach one end of your air hose to the quick-connect coupler on your compressor’s regulator outlet. Most quick-connect couplers simply push together with a satisfying click sound. Ensure the connection is fully seated to prevent air leaks. The male connector on the hose should fit snugly into the female receiver on the compressor side.
Steps for hose connection:
- Align the male and female quick-connect ends carefully.
- Push firmly until you hear or feel a click.
- Gently tug the hose to confirm the connection is secure.
- Check for any visible gaps or misalignment.
Attaching the Nailer
Take the free end of your air hose and connect it to your air nailer’s air inlet port. This port is usually located on the bottom or side of the nailer body. Again, use the quick-connect system to join the hose to the nailer. Push the connection firmly until it seats completely. Many nailers have a small spring-loaded collar that must be pressed to disconnect the hose, indicating a secure connection when released.
Before powering on your compressor, verify all connections are tight. Walk around your setup and visually inspect each joint. Listen for any hissing sounds that indicate leaks. If you detect a leak, disconnect the hose immediately and reattach it more firmly. Some professionals apply a thin layer of thread-sealing compound to quick-connect fittings, though modern couplers rarely require this step.
Adjusting Pressure Settings
Now power on your compressor and allow the tank to fill completely. Most compressors take 5 to 15 minutes to reach full pressure, depending on tank size. Once the tank is full, locate the pressure regulator’s adjustment knob. This knob typically has a small screw or lever that increases or decreases output pressure. Consult your nailer’s manual for the exact pressure specification—most brad nailers require 70 to 85 PSI, while finish nailers need 80 to 90 PSI.
Adjustment process:
- Turn the regulator adjustment screw slowly clockwise to increase pressure.
- Watch the pressure gauge as you adjust to reach your target PSI.
- Turn counterclockwise to decrease pressure if you overshoot.
- Test fire the nailer on scrap material to verify proper operation.
- Make fine adjustments based on how the nailer performs.
Key Takeaway: Following a systematic connection sequence prevents mistakes and ensures safe, leak-free operation.
How Do You Ensure a Secure, Leak-Free Connection?
Air leaks waste energy, reduce nailer performance, and indicate improper connections. Testing for leaks is a crucial step that many beginners overlook. After connecting your nailer and adjusting pressure, apply a soapy water solution to every connection point. Mix liquid dish soap with water in a spray bottle and spray all joints, couplers, and fittings. Bubbles indicate escaping air and require immediate attention.
Common leak sources and fixes:
- Quick-connect couplers: Disconnect and reconnect more firmly.
- Threaded fittings: Apply Teflon tape and reconnect.
- Hose cracks: Replace the hose immediately.
- Regulator outlet: Tighten the connection or replace the regulator.
- Nailer inlet port: Check for debris and clean before reconnecting.
Teflon tape, also called plumber’s tape, is essential for sealing threaded connections. Wrap the tape clockwise around the male threads three to four times before screwing the fitting together. This prevents air from escaping along the thread path. For quick-connect couplers, ensure both the male and female connectors are clean and free of dirt or dust before joining them.
Inspect your air hose regularly for visible damage, cracks, or bulges. A damaged hose can burst under pressure, creating a safety hazard. Most professional-grade hoses last 5 to 10 years with proper care. Store your hose in a cool, dry location away from direct sunlight, which degrades the rubber over time. Coil the hose loosely or hang it on a wall-mounted reel to prevent kinks and permanent creases.
Key Takeaway: Regular leak testing and proper maintenance keep your system running safely and efficiently.
What Practical Tips Improve Your Air Nailer Setup?
Beyond basic connection, several best practices enhance your pneumatic tool experience. Drain your compressor tank daily to remove accumulated moisture. Water in the air system causes rust inside your nailer, reducing its lifespan and affecting performance. Most compressors have a small drain valve at the bottom of the tank—simply open it and let water drip out into a bucket. This 30-second task prevents costly repairs.
Maintenance checklist for optimal performance:
- Drain the compressor tank every day before shutting down.
- Check the air filter monthly and replace when clogged.
- Oil your nailer regularly according to the manufacturer’s schedule.
- Inspect hoses and couplers for damage before each use.
- Keep the compressor intake area clear of dust and debris.
- Store your nailer in a dry location away from extreme temperatures.
Proper nailer maintenance extends tool life significantly. Most pneumatic nailers require a few drops of pneumatic tool oil in the air inlet before each work session. This lubricates internal components and prevents wear. Never use regular machine oil or WD-40 substitutes—these products damage pneumatic tool seals. Purchase dedicated pneumatic tool oil from any hardware store.
Consider your work environment when setting up your system. If you’re working outdoors or in dusty conditions, invest in a high-quality air filter and moisture trap. These components protect your nailer from debris and water damage. For longer work sessions, a larger compressor tank reduces the frequency of tank refill cycles, allowing you to work continuously without waiting for pressure to build.
Key Takeaway: Daily maintenance and proper setup practices maximize tool reliability and longevity.
How Do You Troubleshoot Common Connection Problems?
Even with careful setup, you may encounter issues. The most common problem is inconsistent nailer operation—the tool fires weakly or fails to drive fasteners completely. This usually indicates insufficient air pressure or a leak somewhere in the system. First, verify your pressure regulator is set to the correct PSI for your specific nailer model. Recheck your nailer’s manual to confirm the exact pressure requirement.
If pressure is correct, perform the soap bubble test again on every connection. Sometimes leaks develop slowly as couplers wear. If you find a leak at a quick-connect coupler, disconnect it and inspect both the male and female ends for dirt or damage. Clean with a dry cloth and reconnect firmly. If the leak persists, the coupler may be worn and require replacement.
Troubleshooting guide for common issues:
- Nailer won’t fire: Check pressure setting and verify compressor is running.
- Weak fastener penetration: Increase pressure gradually until proper depth is achieved.
- Hissing sounds during operation: Locate leak with soap solution and repair immediately.
- Nailer jams frequently: Remove nails and check for debris in the magazine.
- Compressor cycles on and off rapidly: Your system may have a significant leak.
If your compressor cycles on and off constantly, you have a substantial air leak. Perform a thorough inspection of all connections, the hose, and the regulator. A failing regulator is a common culprit—if tightening all connections doesn’t solve the problem, replace the regulator. Never operate a pneumatic system with unrepaired leaks, as this stresses the compressor motor and wastes electricity.
Key Takeaway: Systematic troubleshooting identifies and fixes most connection issues quickly.
What Safety Precautions Should You Follow?
Air pressure is a powerful force that demands respect. Always wear safety glasses when operating pneumatic tools, as fasteners or debris can ricochet unexpectedly. Never point a nailer at yourself, another person, or any body part. Treat every pneumatic tool as if it’s loaded and ready to fire. Keep your fingers and hands away from the firing mechanism during operation.
Essential safety practices:
- Always wear ANSI-approved safety glasses during operation.
- Disconnect the air hose before clearing jams or changing fasteners.
- Never leave a pressurized system unattended.
- Turn off the compressor before disconnecting any components.
- Use only approved quick-connect couplers and fittings.
- Check hoses and connections for damage before each use.
When clearing a jam, always disconnect the air hose from the nailer first. This prevents accidental firing while you’re working on the tool. Some professionals add a ball valve between the compressor and hose for quick pressure shutoff during maintenance. This extra safety feature is inexpensive and highly recommended for frequent users.
Store your compressor and nailer in a secure location away from children and unauthorized users. Pneumatic tools are powerful and potentially dangerous in untrained hands. If you’re sharing your equipment with others, provide clear instruction on safe operation and connection procedures. Never assume someone knows how to use these tools safely.
Key Takeaway: Safety awareness and proper precautions prevent serious injuries and equipment damage.
Recommended Products

Ailbiuko 45Pcs 1/4" Air Hose Fittings Coupler & Plug Air Compressor Kit
- VALUE PACK: 45-Pack 1/4" quick connect air fitting kit, which includes female air coupler x 4, male air coupler x 4, male air plug x 14, female air plug x 14, hex coupler x 4, hex nipple x 4, teflon tape x 1, which can almost meet your basic needs
- PREMIUM MATERIAL: Our air hose fittings are made of iron(except for the hex coupler and nipple, they are made of brass), and a layer of copper is plated outside the fittings to improve corrosion resistance and extend the service life, ensuring exceptional durability and reliability even in heavy-duty applications
- STANDARD DESIGN: Industrial grade M/D type, air fitting is designed with four large locking balls for fixing and locking the plug to ensure a reliable connection, the maximum pressure of the air fitting and plug is 300psi, and the basic body size is 1/4 inch
- QUICK CONNECTION: Easy to install and quick disconnect, interchangeable/compatible with most manufacturers' coupler plugs, preventing air leaks and costly replacements
- WIDE APPLICATION: Our 1/4 " air couplers and air plugs kit are widely applied to professional job sites, automotive shops, auto dealership service departments, homes, in garages for air hoses, air compressors, air tools, air nailers, air blow guns, pressure washer, etc


As an Amazon Associate we earn from qualifying purchases. Product prices and availability are accurate as of the date/time indicated.

YOTOO 3/8" x 50ft Hybrid Air Hose 300 PSI Kink-Resistant
- EXCELLENT MATERIAL: This air hose is blended rubber and PVC air hose is heavy duty, lightweight, flexibility,abrasion resistance and all weather use.
- EASE TO USE: Equiped with 1/4” industrial NPT fittings and quick coupler for directly connect to air compressor and air tools. No need to buy seperately air fittings.
- BOTH ENDS INSTALLED BEND RESTRICTORS: Bend restrictors reduce kinking and help to increase the life of the air hose
- HIGH STRENGTH: 3/8 INCH inner diameter by 50 FEET long delivers up to 300 PSI for maximum working pressure,
- TWO YEAR limited warranty


As an Amazon Associate we earn from qualifying purchases. Product prices and availability are accurate as of the date/time indicated.
Frequently Asked Questions
Can I connect multiple nailers to one compressor?
Yes, you can connect multiple nailers using a manifold block with multiple outlets. However, ensure your compressor has sufficient CFM output to power all tools simultaneously. Most compressors can support one or two nailers running at the same time. Check your compressor’s specifications and nailer requirements before attempting this setup. Using a larger tank compressor improves performance when operating multiple tools.
What PSI should I set for my air nailer?
Most brad nailers operate at 70 to 85 PSI, while finish nailers need 80 to 90 PSI. Consult your specific nailer’s manual for exact pressure requirements. Start at the lower end of the recommended range and increase pressure gradually until the nailer drives fasteners to the proper depth. Excessive pressure can damage the tool or cause fasteners to split wood.
Why is my air hose leaking at the quick-connect coupler?
Leaks at quick-connect couplers usually result from improper seating or dirty connector surfaces. Disconnect the hose and inspect both the male and female ends for dirt or damage. Clean with a dry cloth and reconnect firmly, pushing until you hear a click. If the leak continues, the coupler may be worn and require replacement. Modern couplers rarely fail but do wear over time with heavy use.
How often should I drain my compressor tank?
Drain your compressor tank daily before shutting down the system. This removes accumulated moisture that can rust internal components and damage your nailer. In humid environments, you may need to drain the tank multiple times per day. This simple maintenance task takes less than a minute and significantly extends your equipment’s lifespan.
Do I need to oil my air nailer?
Yes, most pneumatic nailers require a few drops of dedicated pneumatic tool oil in the air inlet before each work session. This lubricates internal components and prevents wear. Use only pneumatic tool oil—never substitute with regular machine oil or WD-40. Check your nailer’s manual for specific oiling intervals and procedures.
What size air hose should I use?
For most nailers, a 3/8-inch diameter hose is adequate for runs up to 50 feet. Longer hose runs require larger diameter hoses to minimize pressure drop. A 1/2-inch hose works well for setups exceeding 75 feet. Check your compressor specifications for recommended hose sizes. Using an undersized hose reduces pressure at the nailer and affects performance.
Can You Connect an Air Nailer to a Compressor Correctly Every Time?
Connecting an air nailer to a compressor is a fundamental skill that every pneumatic tool user must master. By following the step-by-step process outlined in this guide, you’ll establish a safe, reliable connection that delivers consistent performance. Remember to gather all necessary components, follow proper connection sequences, test for leaks, and maintain your equipment regularly. The investment in quality components and careful setup pays dividends through years of trouble-free operation.
Your success with pneumatic tools depends largely on understanding these foundational concepts. Take time to read your nailer’s manual thoroughly, as different models may have specific requirements. Don’t hesitate to consult online resources or ask experienced professionals for advice. As you become more comfortable with air nailer operation, you’ll develop intuition about pressure settings, maintenance needs, and troubleshooting techniques. For related pneumatic tool guidance, explore our comprehensive guides on using air ratchets in tight spaces and using air impact wrenches for additional pneumatic tool expertise.
With proper knowledge and practice, you’ll confidently connect and operate your air nailer in any situation. This skill opens doors to faster, more efficient fastening work on construction projects, furniture building, and countless other applications. Start with the basics, maintain your equipment diligently, and always prioritize safety above speed or convenience. Your pneumatic tool setup will reward you with years of reliable service.







Write Your Review
No reviews yet. Be the first to share your experience!