

What Is an HVLP Spray Gun and Why Does Setup Matter?
An HVLP spray gun uses high-volume, low-pressure air to atomize paint into a fine mist for smooth, professional finishes. HVLP stands for high-volume, low-pressure, meaning it delivers more air at lower pressure than traditional spray guns. This design reduces overspray, saves paint, and produces superior coverage on furniture, vehicles, and walls. Proper setup is critical—incorrect air pressure, fluid flow, or spray pattern will result in runs, drips, uneven color, or wasted material. Taking time to configure your HVLP gun correctly ensures consistent results and extends equipment life.

HomeRight Super Finish Max HVLP Paint and Stain Sprayer, 3 Brass Tips
- Life changing paint sprayer: this paint sprayer requires less thinning compared to finish max or other hand-held paint sprayers
- Easy to use for eager Painters: fast and easy setup, multiple spray settings and quick cleaning make this sprayer a top pick for do-it-yourselfers
- Lightweight: despite having more power than the finish max, this paint sprayer is still lightweight in the user’s hand
- Spray everything with less thinning: ideal for spraying a smooth finish on fences, decks, furniture, cabinets, crafts, dressers or anything you want
- Best purchase you will ever make: save money by using this paint sprayer to tackle all of your household painting and staining projects


As an Amazon Associate we earn from qualifying purchases. Product prices and availability are accurate as of the date/time indicated.
HVLP spray guns come in two main types: gravity-fed and siphon-fed models. Gravity-fed guns mount the paint cup on top and work best for detail work and vertical surfaces. Siphon-fed guns draw paint from a cup below and suit larger projects and thicker coatings. Both require the same fundamental setup steps: air pressure adjustment, fluid delivery calibration, and spray pattern control.
Key Takeaway: HVLP spray gun setup involves balancing air pressure, fluid flow, and spray pattern to achieve professional, even paint application.
How Do You Prepare Your HVLP Spray Gun Before First Use?
Before spraying any paint, inspect your HVLP gun for damage and cleanliness. Check the air inlet, fluid nozzle, and spray cap for cracks or debris. A damaged gun will leak air or paint, reducing efficiency and creating mess. Clean all internal passages with the manufacturer’s recommended solvent to remove factory oils and dust.
Next, assemble the gun according to the instruction manual. Install the fluid tip, nozzle cap, and air cap in the correct order—reversing these steps causes leaks. For gravity-fed guns, attach the paint cup securely to prevent spills during use. For siphon-fed models, position the cup below the gun and ensure the pickup tube reaches the bottom of the container.
Key preparation steps include:
- Inspect the air inlet for cracks and test air flow with no paint loaded.
- Clean the fluid nozzle and tip with appropriate solvent to remove dried paint.
- Verify all seals and gaskets are present and undamaged.
- Assemble components in manufacturer order to prevent air and paint leaks.
- Fill the paint cup with filtered paint or test fluid to check for leaks.
Key Takeaway: Proper preparation—inspection, cleaning, and assembly—prevents leaks and ensures your HVLP gun operates at peak efficiency.
What Air Pressure Settings Should You Use for HVLP Spray Guns?
Air pressure is the foundation of HVLP spray gun performance. HVLP guns typically operate at 25 to 29 pounds per square inch (PSI) at the cap, which is significantly lower than conventional spray guns. However, the exact pressure depends on paint viscosity, fluid type, and spray pattern width. Check your gun’s manual for the recommended pressure range, as exceeding it wastes paint and causes excessive overspray.
To set air pressure correctly, connect your HVLP gun to a regulated air compressor with a moisture trap and inline regulator. Adjust the regulator to the starting pressure recommended by the manufacturer—usually 25 PSI for most HVLP guns. Spray a test pattern on cardboard or a test surface. If the spray is uneven, sputters, or has a large tail, increase pressure in 1 PSI increments until the pattern becomes uniform and circular.
Pressure Adjustment for Different Paint Types
Different paint formulations require slight pressure adjustments. Thinner paints like acrylics and waterborne coatings work best at 25 to 26 PSI. Thicker paints like lacquers and enamels may need 27 to 29 PSI. Always start at the lowest recommended pressure and increase only if necessary. Using excessive pressure wastes material and creates a wide, uncontrollable spray pattern.
Air pressure settings to remember:
- Waterborne acrylics: 25–26 PSI for optimal atomization without overspray.
- Lacquers and enamels: 27–29 PSI for proper paint flow and coverage.
- Stains and thinned coatings: 24–25 PSI to prevent excessive misting.
- Always start low and increase by 1 PSI increments until spray pattern improves.
- Monitor air pressure throughout the job—compressor output may fluctuate.
Key Takeaway: Start at the manufacturer’s minimum pressure (typically 25 PSI) and increase only 1 PSI at a time until you achieve a uniform, circular spray pattern.
How Do You Adjust Fluid Delivery and Spray Pattern on an HVLP Gun?
Fluid delivery controls how much paint flows from the nozzle. Most HVLP guns have a fluid adjustment knob or screw on the back of the gun. Turning it clockwise decreases fluid flow; counterclockwise increases it. Start with the knob turned fully clockwise, then back it off one-quarter turn. Spray a test pattern and adjust incrementally until you achieve smooth, even coverage without runs or drips.
The spray pattern control determines the width and shape of the mist. A wider pattern covers more area but requires more paint and produces more overspray. A narrower pattern concentrates paint for detail work and vertical surfaces. Most HVLP guns have a pattern adjustment knob on the back of the air cap. Rotate it to adjust from a narrow vertical line to a wide oval pattern. For general painting, a medium-width pattern works best.
Fine-Tuning Fluid and Pattern Controls
Achieving the perfect fluid and pattern balance takes practice. Spray test patterns on cardboard at different distances and angles. Watch for runs, drips, dry spots, or excessive overspray. If the pattern is uneven or has tails, reduce air pressure or adjust the fluid knob slightly. If coverage is thin or patchy, increase fluid slightly or reduce distance to the surface.
Spray pattern adjustment checklist:
- Start with pattern control fully open (widest setting) for large surface areas.
- Reduce pattern width for detail work, trim, and vertical surfaces.
- Test spray on cardboard at 6 to 8 inches distance before painting the final surface.
- Adjust fluid knob in quarter-turn increments and re-test after each change.
- Keep spray distance consistent (typically 6–10 inches) for uniform coverage.
Key Takeaway: Fluid delivery and spray pattern work together—balance them by testing on cardboard and adjusting incrementally until coverage is smooth and even.
What Are the Essential Steps to Prepare Paint for HVLP Spraying?
Paint preparation directly affects spray gun performance and finish quality. Strain all paint through a fine mesh filter (100 to 150 mesh) to remove dust, lint, and dried particles that clog the fluid nozzle. Even new paint may contain contaminants from manufacturing or storage. A clogged nozzle causes uneven spray patterns, sputtering, and incomplete coverage.
Check paint viscosity using a viscosity cup or by observing how it flows. HVLP guns work best with paint that flows like milk—not too thick, not too thin. If paint is too thick, thin it with the appropriate solvent (water for acrylics, mineral spirits for enamels, lacquer thinner for lacquers). Add solvent in small amounts and stir thoroughly. If paint is too thin, it won’t provide adequate coverage and may run on vertical surfaces.
Paint preparation essentials:
- Strain paint through a 100–150 mesh filter to remove all particles and contaminants.
- Check paint viscosity—it should flow like milk, not syrup or water.
- Thin paint gradually with appropriate solvent if too thick; add in 5–10% increments.
- Stir paint thoroughly after thinning to ensure uniform consistency throughout.
- Fill the spray gun cup only three-quarters full to prevent overflow during use.
Key Takeaway: Filtered, properly thinned paint ensures consistent flow through the HVLP gun and produces a smooth, professional finish.
How Do You Test Your HVLP Spray Gun Before Painting?
Testing your HVLP spray gun on scrap material prevents mistakes on your final project. Fill the cup with paint or test fluid, hold the gun 6 to 8 inches from a piece of cardboard, and squeeze the trigger. The spray pattern should be circular and uniform with no tails, sputtering, or dry spots. If the pattern is uneven, adjust air pressure by 1 PSI and re-test.
Perform a full-coverage test by spraying overlapping passes on cardboard, simulating your actual painting technique. Watch for runs, drips, or thin coverage. If you see runs, reduce fluid delivery or increase distance. If coverage is thin, reduce distance slightly or increase fluid flow. Test at the same angle and distance you’ll use on the final surface.
Troubleshooting Common Spray Patterns
A poor spray pattern reveals setup problems before they ruin your project. A pattern with a tail at the bottom indicates air pressure is too high or the air cap is misaligned. Sputtering or inconsistent spray suggests low air pressure, clogged nozzle, or insufficient paint in the cup. Dry spots or uneven coverage mean fluid delivery is too low or paint is too thick.
Common spray pattern issues and fixes:
- Tail at bottom of pattern: Reduce air pressure by 1–2 PSI or check air cap alignment.
- Sputtering or spitting: Increase air pressure, clean the fluid nozzle, or fill the cup higher.
- Dry spots or thin coverage: Increase fluid delivery or reduce spray distance to 6 inches.
- Heavy runs or drips: Reduce fluid delivery or increase spray distance to 10 inches.
- Uneven pattern: Check that the air cap is seated correctly and tighten if loose.
Key Takeaway: Test your spray gun on scrap material and adjust air pressure, fluid, and distance until the pattern is circular, uniform, and produces smooth coverage.
What Maintenance Steps Keep Your HVLP Spray Gun in Top Condition?
Regular maintenance extends the life of your HVLP spray gun and prevents costly repairs. After each use, flush the gun with the appropriate solvent—water for acrylics, mineral spirits for enamels, lacquer thinner for lacquers. Spray solvent through the gun into a waste container until the spray is clear and no paint remains. This prevents dried paint from clogging the nozzle and internal passages.
Disassemble the gun at least once a week during heavy use. Remove the fluid tip, nozzle, and air cap. Soak these parts in solvent for 15 to 30 minutes, then clean them with a soft brush. Never use wire brushes or abrasive tools—they damage precision surfaces. Dry all parts thoroughly with a lint-free cloth before reassembling.
Maintenance checklist for HVLP spray guns:
- Flush the gun with appropriate solvent immediately after each use.
- Disassemble and soak the fluid tip and air cap weekly in solvent.
- Clean parts with a soft brush—never use wire or abrasive materials.
- Inspect seals and gaskets monthly; replace if cracked or worn.
- Store the gun in a clean, dry location with the cap on the nozzle.
Key Takeaway: Flush and clean your HVLP gun after each use, and disassemble it weekly to prevent paint buildup and maintain consistent performance.
How Do You Connect Your HVLP Spray Gun to an Air Compressor?
A properly connected air compressor is essential for HVLP spray gun operation. Your compressor must deliver enough volume and pressure—most HVLP guns require 15 to 20 cubic feet per minute (CFM) at 25 to 29 PSI. Undersized compressors struggle to maintain pressure during continuous spraying, resulting in inconsistent spray patterns. Check your compressor specifications and compare them to your gun’s air requirements.
Connect the compressor to your HVLP gun using a hose rated for the required pressure (typically 50 PSI minimum). Install a moisture trap and inline regulator between the compressor and gun to remove water vapor and provide precise pressure control. Water in the air causes paint to spatter and creates a rough finish. The inline regulator lets you adjust pressure at the gun without adjusting the compressor itself.
Air compressor setup steps:
- Choose a compressor with at least 15–20 CFM capacity at your required PSI.
- Install a moisture trap on the compressor discharge line to remove water vapor.
- Add an inline regulator downstream of the moisture trap for precise pressure control.
- Use a hose rated for at least 50 PSI to handle compressor output safely.
- Check all connections for leaks before connecting the spray gun.
If you’re setting up a complete air system, check our guide on how to choose the right air compressor for home use in 2026 to select equipment that matches your HVLP gun’s needs.
Key Takeaway: Match your compressor capacity to your HVLP gun’s requirements, and use a moisture trap and inline regulator to ensure clean, consistent air pressure.
What Practical Tips Ensure Professional Results When Using an HVLP Spray Gun?
Professional results depend on technique as much as setup. Maintain a consistent distance from the surface—typically 6 to 10 inches for most HVLP guns. Vary your distance and you’ll get uneven coverage: too close causes runs, too far produces thin, dusty finish. Keep your wrist straight and move the gun in smooth, parallel strokes. Overlap each pass by 50 percent to eliminate dry stripes.
Spray in a well-ventilated area or outdoors to avoid inhaling paint mist. Wear a respirator rated for organic vapors and a protective suit to stay clean. Spray during calm weather—wind carries overspray and disrupts the spray pattern. Avoid spraying in direct sunlight, which can dry the paint too quickly and cause brush marks.
Step-by-Step Spraying Technique
Follow these steps for professional, even coverage:
- Start spraying before reaching the surface and continue past it to maintain consistent overlap.
- Use smooth, parallel strokes moving left to right or top to bottom.
- Overlap each pass by 50 percent—not 100 percent, which wastes paint and causes runs.
- Keep the gun perpendicular to the surface at all times; angled spraying causes uneven coverage.
- Release the trigger before stopping motion to avoid heavy paint buildup at the end of each stroke.
- Allow proper drying time between coats as specified by the paint manufacturer.
Key Takeaway: Maintain consistent distance, use smooth overlapping strokes, and follow proper drying times for professional, even paint coverage.
Recommended Products

VONFORN Paint Sprayer, 700W Spray Paint Gun with 4 Nozzles & 3 Patterns
- 【4 Nozzles & 3 Spray Patterns】VONFORN 700W paint sprayer includes 4 nozzle sizes (1.0mm, 1.5mm, 2.0mm, 3.0mm) to accommodate various DIY projects on surfaces such as furniture, fences, walls, doors, and garden sets. It supports 3 adjustable spray patterns: horizontal, vertical, and circular, making it suitable for a wide variety of application scenarios
- 【Dust Blowing & Convenient Cleaning】Before spraying, use the matching dust blowing joint to clear dust and debris from the surface for a smoother finish. After use, simply connect the cleaning connector to a faucet to flush out residual paint inside the tube, enabling quick and efficient cleaning
- 【Easy to Use & Clean】This paint sprayer features tool-free assembly, allowing even beginners to get started quickly with the included manual. To maintain optimal performance, we include a cleaning brush and a nozzle needle to remove residue, enabling thorough cleaning after every project
- 【Adjustable Flow Control】This paint sprayer features a flow control knob that allows you to fine-tune the paint output to fit various project needs. Regulating the flow helps achieve a consistent finish while supporting efficient paint usage during operation
- 【What You Will Get】Package includes: 1 × Paint Sprayer, 4 × Nozzle Sizes, 5 × Paint Filters, 1 × Viscosity Cup, 1 × Nozzle Cleaning Needle, 1 × Cleaning Brush, 1 × Dust Blowing Joint, 1 × Cleaning Connector, 1 × Pot Lid, and 1 × User Manual. If you have any problems with our paint sprayer, please don't hesitate to reach out to us, and we will answer it within 24 hours


As an Amazon Associate we earn from qualifying purchases. Product prices and availability are accurate as of the date/time indicated.

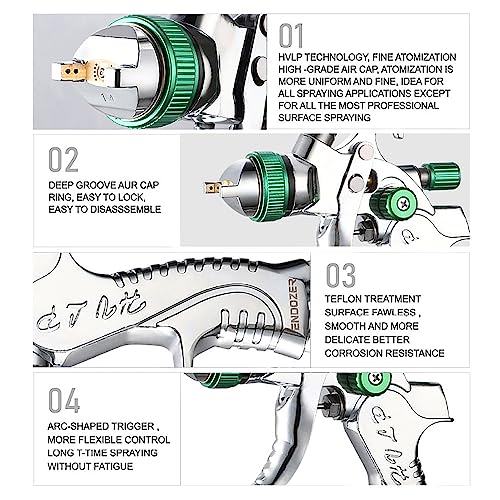
ENDOZER HVLP Gravity Feed Spray Gun Kit with 3 Nozzles
- This spray gun is supplied with a 20 oz. (600 ml) gravity feed cup, with 1.4 1.7 2.0mm real stainless steel nozzle and needle.
- The hvlp spray gun hood is made of brass, wear-resistant and corrosion-resistant, 15 holes design, uniform atomization, excellent effect. 1/4 "NPT inlet and quick adapter of the same specification.
- Fluid control adjusts the amount of spray paint, pattern control adjusts the fan pattern size, and the air conditioning valve provides the ability to adjust the air flow rate. It is designed to provide uniform spraying and particle size for all types of surface coatings.
- In the painting process effective paint filter(product contains) recommended to reduce any small pieces of dried paint or pollutant in the fluids to ensure a perfect finish. In addition, this air spray gun case also includes accessories such as air pressure gauge, quick adapter set, etc., Compatible with various usage scenarios.
- Endozer spray paint gun can be used for various purposes such as furniture repair, mural painting, car painting, painting, arts and crafts, paint coating of industrial products, spray paint of factories, and model making. HVLP air spray gun that is easy to use even for beginners


As an Amazon Associate we earn from qualifying purchases. Product prices and availability are accurate as of the date/time indicated.
Frequently Asked Questions
What PSI should I use for my HVLP spray gun?
Most HVLP spray guns operate at 25 to 29 PSI at the cap. Start at 25 PSI and increase by 1 PSI increments until the spray pattern becomes circular and uniform. Higher pressure wastes paint and creates excessive overspray. Always check your gun’s manual for the manufacturer’s recommended pressure range for your specific model.
How do I fix a sputtering HVLP spray gun?
Sputtering usually indicates low air pressure, a clogged fluid nozzle, or insufficient paint in the cup. First, increase air pressure by 1 to 2 PSI. If that doesn’t help, remove and clean the fluid tip with solvent. Finally, ensure the paint cup is filled at least one-quarter full so the pickup tube can draw paint consistently.
Can I use an HVLP spray gun with thick paint?
HVLP guns work best with paint thinned to milk-like consistency. If your paint is too thick, thin it gradually with the appropriate solvent—water for acrylics, mineral spirits for enamels, lacquer thinner for lacquers. Add solvent in 5 to 10 percent increments and stir thoroughly. Thick paint clogs the nozzle and produces uneven spray patterns.
How often should I clean my HVLP spray gun?
Flush your HVLP gun with solvent immediately after each use to prevent dried paint from clogging the nozzle. Disassemble and soak the fluid tip and air cap weekly during regular use. Inspect seals and gaskets monthly and replace them if cracked. Proper maintenance prevents costly repairs and ensures consistent performance.
What size air compressor do I need for an HVLP spray gun?
Most HVLP spray guns require 15 to 20 cubic feet per minute (CFM) at 25 to 29 PSI. A compressor smaller than this will struggle to maintain pressure during continuous spraying. Check your gun’s specifications and compare them to your compressor’s CFM rating at the required PSI to ensure adequate air supply.
Why does my HVLP spray gun have a tail at the bottom of the spray pattern?
A tail at the bottom of the spray pattern indicates air pressure is too high or the air cap is misaligned. Reduce air pressure by 1 to 2 PSI and re-test. If the tail persists, remove the air cap, inspect it for damage or misalignment, and reinstall it firmly. A damaged air cap may need replacement.
How Can You Master HVLP Spray Gun Setup for Professional Results?
Setting up an HVLP spray gun correctly transforms your painting projects from amateur to professional. The process involves balancing air pressure, fluid delivery, and spray pattern—each element working together to produce smooth, even coverage without runs, drips, or overspray. Start with the manufacturer’s recommended settings, test on scrap material, and adjust incrementally until you achieve a circular, uniform spray pattern. Proper paint preparation—filtering and thinning—ensures consistent flow and prevents nozzle clogs that disrupt your work.
Maintenance is equally important. Flush your gun with solvent after each use and disassemble it weekly to prevent dried paint buildup. A well-maintained HVLP gun delivers reliable performance for years. Remember that technique matters too—maintain consistent distance, use smooth overlapping strokes, and allow proper drying time between coats. With practice and attention to detail, you’ll achieve professional results on furniture, vehicles, walls, and trim.
For related air tool guidance, explore our articles on how to sand a car with a dual action air sander and how to connect an air nailer to a compressor to build a complete pneumatic workshop setup.
Key Takeaway: Master HVLP spray gun setup by balancing air pressure, fluid delivery, and spray pattern, then maintain your equipment and practice proper technique for professional, consistent results.







Write Your Review
No reviews yet. Be the first to share your experience!